Setting up the Salesforce integration
An overview of Planhat's Salesforce integration, and step-by-step guidance to set it up
Summary
Data you can sync
CRM data: standard and custom objects (see data mapping table below)
Sync direction
Managed at object/model and field level
Choose between:
Bidirectional
Receive from Salesforce
Send to Salesforce
Receive from Salesforce
Sync frequency
Automatic sync
Salesforce to Planhat: standard sync is up to 10 minutes
Planhat to Salesforce: near instant
Manual: on demand
Data mapping
See table below
Who is this article for?
All Planhat users
It's particularly relevant to those setting up the Salesforce integration
🎥 Quick video overview
Series
We have a series of articles on the Salesforce integration:
Setting up the Salesforce integration ⬅️ You are here
Syncing Company/Account group structures (parent/child) via the Salesforce integration
Syncing Salesforce Tasks with Planhat Conversations (Notes) and Tasks
Tasks and Notes in the Salesforce integration - technical details of the standard sync sections
Article contents
This article covers a lot, so use the links below to jump to the relevant section if you would like to look up something specific!
Setting up the Salesforce integration
Introduction
Planhat's bidirectional Salesforce integration enables you to bring your CRM data into Planhat quickly and easily. Within Planhat, all your different data (from a variety of sources) is consolidated, meaning you get a full 360 degree view of your customers. You can analyse your data in Planhat in lots of advanced ways without requiring your developers, display your data clearly for greater insights, and automatically take action in response to data for maximum efficiency and productivity. With Planhat's unlimited user model, it's not just Customer Success teams who can benefit from all the features - Sales, Marketing and Product etc. can use it too.
In addition, you can push data from Planhat to Salesforce, so if you do have colleagues still using Salesforce, you can ensure everyone is the same page with up-to-date customer information. For example, you could sync Planhat customer analysis such as Health Scores into Salesforce to help your Sales team identify potential expansion opportunities or references. Or, since Planhat can create End User (Contact) records from various connected systems, you could consider syncing End Users (Contacts) to Salesforce if your Marketing team is working there.
📝 In this article, we will give an overview of what's synced (data mapping), sync frequency, the basic principles of the integration (sync direction, filtering, and custom field mapping), and then take you through the steps of connecting the integration and configuring each model/object section.
⚠️ Please be aware
Some of the screenshots in this article were taken from the original Planhat platform (app.planhat.com), but the principles remain the same in upgraded Planhat (ws.planhat.com).
Data mapping overview
Some of the data mapping is predefined (e.g. the Salesforce Account object is always mapped to the Planhat Company model), but there is also a great deal of flexibility possible.
Here's an overview of the model/object pairings in the Salesforce integration.
Planhat model | Sync direction | Salesforce object |
Company | Bidirectional (or one-way) | Account |
End User | Bidirectional (or one-way) | Contact |
Task | Bidirectional (or one-way) | Task |
Conversation - type "note" or custom | Bidirectional (or one-way) | Note or ContentNote (using pre-built sync section) OR your choice of Salesforce object (e.g. Task) using custom sync section |
Conversation - type "ticket" | From Salesforce to Planhat | Case |
License, Sale (NRR), Opportunity, Asset, Project, Churn, Invoice, Campaign, Objective or Workspace | Bidirectional (or one-way) | Your choice of object (pick for each model) |
Planhat model already mapped (see note below) | Bidirectional (or one-way) | Your choice of additional Salesforce object |
Further details:
Within these model/object pairings, not all fields are automatically synced, only a subset (learn more here); you can add custom field mapping for your choice of fields (detailed here)
Salesforce objects need to have a relationship to the Account (as in Planhat, other models are connected to the Company)
For all model/object combinations other than Salesforce Case, the sync can be bidirectional, but if you only want it to be one way (e.g. from Salesforce to Planhat), you can set it to that
You can set sync direction on the field level in addition to the model/object level - we discuss this in further detail within this article
You choose a single Salesforce object to be synced to both the License and the Sale (NRR) models
The bottom row in the table describes an "extension object"
If you'd like to learn more about extension objects, check out our deep-dive technical article here
Extension objects aren't applicable for the Planhat License or Sale (NRR) models
Not all Planhat models are available in all contracts - speak to your CSM if you would like to add a model
Sync frequency overview
The Salesforce integration syncs your data automatically, making it simple to keep both Planhat and Salesforce up to date, without requiring extra manual effort from you.
You can also manually sync, on demand - either all models/objects, a specific model/object, or data related to a particular Company.
Quick summary of the main, default automatic sync:
Planhat to Salesforce: New/updated records in Planhat are sent to Salesforce near instantly
Salesforce to Planhat: New/updated records in Salesforce are synced to Planhat by a job that runs every 10 minutes. (Occasionally the gap between sync job runs could be slightly longer than 10 minutes)

Principles of the Salesforce integration
Before we deep-dive into the details of configuring the Salesforce integration, let's go through the main principles.
Once you've connected the integration to your Salesforce account, you'll see a series of sections, each corresponding to a Planhat model mapping to a Salesforce object. The main parts of these sections are:
We'll go through each of these here.
Sync direction
Here, we're referring to the main sync direction for each model/object section. The Planhat Salesforce integration is bidirectional, meaning you can choose to push data to, and pull data from, each system.
You set the sync direction independently for each model/object pairing, offering a great deal of flexibility.
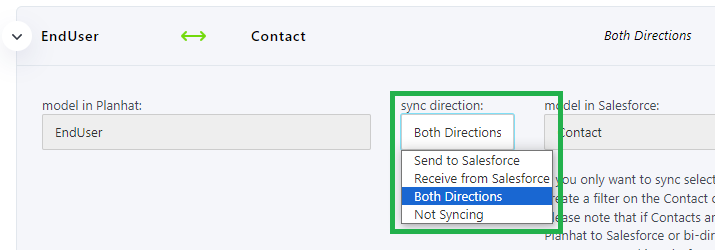
The default is "Not Syncing", so you select another direction to enable the sync of that model/object.
For all objects other than Case, which is a one-way sync from Salesforce to Planhat (so only "Receive from Salesforce" is possible), you can choose from "Send to Salesforce", "Receive from Salesforce", or "Both Directions".
It's possible to change the sync direction later on - e.g. you could initially select "Receive from Salesforce" when you're setting up your Planhat tenant, and then change it to "Both Directions" later on.
When you set up custom field mapping, you can also choose the sync direction for each field - we'll discuss this when we talk about field mapping later in this article.
📌 Important to note
For data security reasons, regardless of direction, the integration does not delete records (e.g. if you manually delete the End User "Jane Brown" in Planhat, the integration won't delete the corresponding Contact "Jane Brown" in Salesforce), but records can be created and updated.In terms of whether null values are synced (which can delete data), see the next section of this article.
Syncing null values
When configuring your sync sections, you will see dropdown boxes where you can choose whether to include null field values in the sync. You enable/disable this separately for send and receive, and this is per model/object sync section.
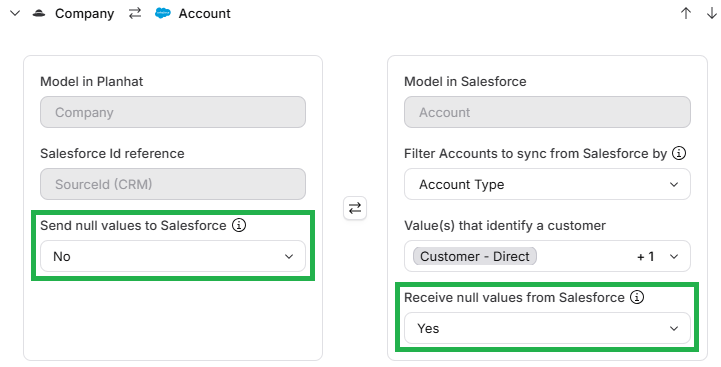
If you are setting up the Salesforce integration now for the first time, the default is that this is not turned on on either side (i.e. it's set to "NO"), which means fields with null values are excluded from the payloads we send to or fetch from Salesforce.
Before these dropdown options were introduced, the default behaviour in the Salesforce integration was that we did fetch/receive null values from Salesforce, but we didn't send null values to Salesforce (with the exception of when a multipicklist value was deselected). Now that the toggle switches are visible, if your integration was already set up, by default you will see the first dropdown ("send to Salesforce") set to "No", with the second dropdown ("receive from Salesforce) set to "Yes", to match the previous behaviour - but now you have the option to edit either setting, via the dropdowns, if you like.
Be aware that if either of these dropdown options is enabled (i.e. set to "Yes"), this could lead to data being wiped (either in Salesforce if you send nulls, or in Planhat if you fetch nulls).
Record filtering
In early 2026, we introduced functionality to set up rules to filter records for both syncing to (i.e. sending to) Salesforce, and syncing from (i.e. fetching from) Salesforce, with a new UI, as shown in the screenshot below. (Previously, you could only filter records being fetched from Salesforce, and in a more limited way.)
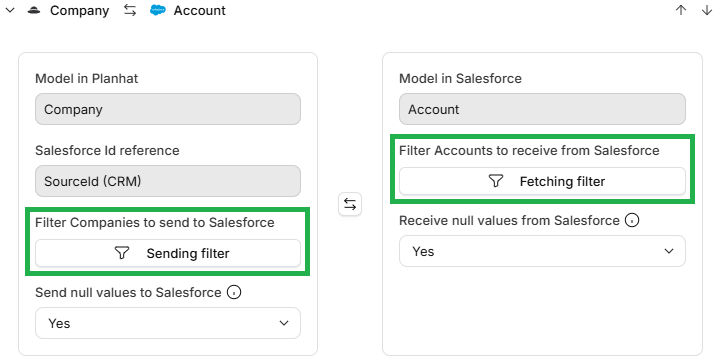
These filters enable you to customize the sync process in a granular way, giving you control over which specific records of each model/object are synced, rather than needing to sync all records or no records of that model/object.
A common use case for the fetching filter is in the Company/Account section, to specify that you only want to fetch Salesforce Accounts with an "Account Type" of "Customer" - that is, they sync into Planhat when they become paying customers, rather than prospects.
Being able to filter on the Planhat side too means you can specify which records of that model are synced back to Salesforce.
You can create sending filters and fetching filters with multiple rules/properties, meaning you don't need to create a field to combine criteria if you want more advanced filtering.
Sending to Salesforce
The "sending filter" in each sync section (the one on the left-hand side of the integration UI) filters Planhat records of that model before they are synced to Salesforce.
This filter works much like the standard Planhat filters you're used to using throughout Planhat. As usual, you can list multiple criteria, grouping/nesting as required. To refresh your filter knowledge, see here.
The example screenshot below demonstrates how you can make use of "Match all" ("AND" operator) and "Match any" ("OR" operator), and also shows rule nesting in a group.
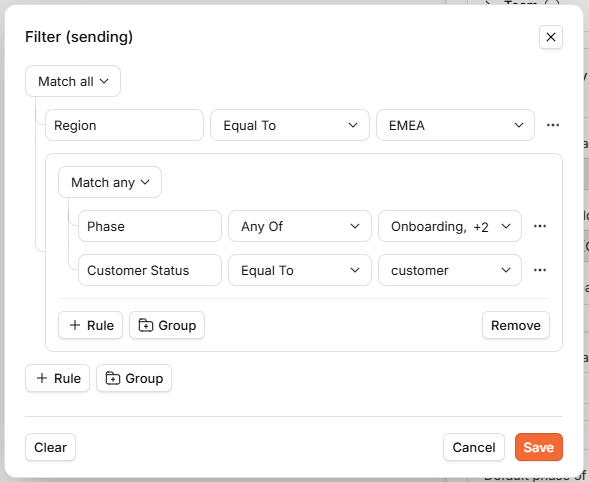
Note that you need to create a new filter here, rather than selecting an existing Global Filter.
📌 Important to note
The "Planhat ticket / Salesforce Case" section of the integration is unique in that it can only be a one-way sync: from Salesforce to Planhat.
Therefore, that part of the integration does not have a sending filter (the type we just discussed), only a fetching filter (as we describe next).
Fetching from Salesforce
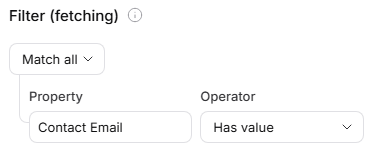
The "fetching filter" in each sync section (the one on the right-hand side of the integration UI) is applied when the integration fetches data from Salesforce to sync into Planhat, restricting which records of that object are synced.
The basic rule structure is:
A property (field) on the Salesforce object
An operator (e.g. "Equal to")
One or more values (e.g. "true")
As you can see in the example below, you can add multiple rules, but it's not possible to apply groups (nesting) - you have just one layer/group of "Match all" ("AND" operator) or "Match any" ("OR" operator).
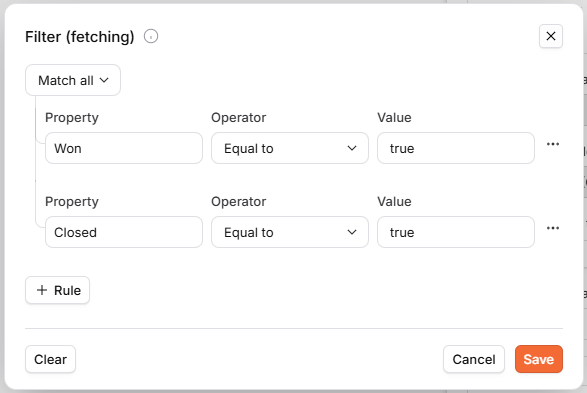
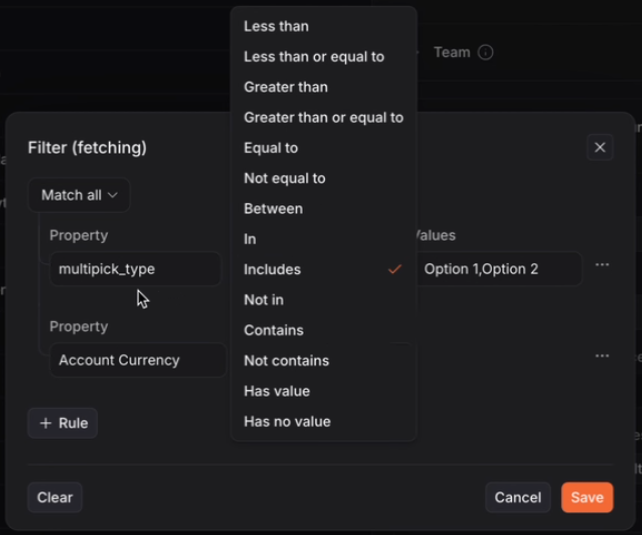
You have a wide variety of operators to choose from, as shown in the example screenshot below. (The exact choices will depend on the type of property selected in the left-hand column.)
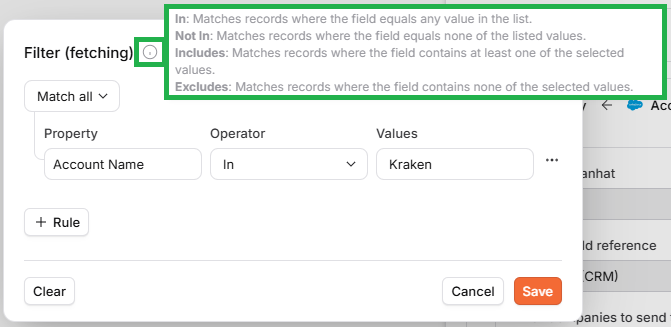
If you mouse over the "i" icon, you will see a tooltip with definitions of some of the more obscure operators, as shown below.
🚀 Tip
If you select an property/operator that allows multiple values, like in the "dark theme" screenshot above above, type in the multiple matching values separated by commas and with no spacing, as shown in that screenshot.
📌 Important to note
If a record is created in Planhat from Salesforce, and then ceases to match the fetching filter for the Salesforce integration, the Salesforce record will receive updates from Planhat, but updates will not flow the other way.
📌 Important to note
The Account/Company acts as a kind of filter itself: in the Planhat data structure, Company is at the top, and (almost) all other models have to link to a Company.
This means that, for example, only Contacts (End Users) belonging to an Account (Company) synced to Planhat are synced in, as Planhat doesn't support End Users not connected to a Company.
Custom field mapping
For most model/object sections, you can set up custom field mapping: link up specific Planhat fields with specific Salesforce fields. (Note that the integration does not create fields, only sync data between them, so you would need to create the fields first before selecting them in the integration.)
There are a small number of standard/default fields included in the sync - for example, Account (Company) name, and first name / last name for Contacts (End Users) - but in addition to that, you can configure which Salesforce fields you would like to map to which Planhat fields.
You don't need to sync every single field that exists in your Salesforce org; think about which fields contains relevant data for your team working in Planhat. Similarly, if you still have colleagues working in Salesforce, consider which Planhat data in particular you may like to sync back.
For the main objects at the top (Account and Contact etc.), the field mapping section will look similar to this:
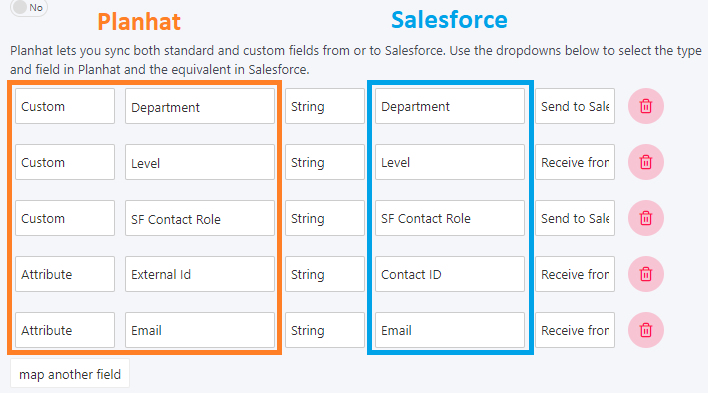
For each set of fields you want to match, click "map another field" to add a new row for you to complete.
From left to right, the columns are:
Use the dropdown to select whether the Planhat field you want to map is:
"Attribute" - a standard/default field (available "out of the box")
"Custom" - a custom field created just in your Planhat tenant
For Account/Company only: "Metrics" - a Company calculated metric created in your Planhat tenant
Specify the Planhat field name:
For "Attribute", you can select the Planhat field from a dropdown list
For "Custom", you should copy and paste the field name (or you can type it in, but it needs to match the field name exactly)
For "Metrics", select your chosen calculated metric from the dropdown list
Select what the field type is - "String", "Number", "Date", and so on
Select your chosen Salesforce field name from the dropdown menu
Choose the sync direction for the field
You will typically set this to the same as the main object sync, but it is possible to set it to a different name
For Account/Company only, the field sync direction can supersede the object sync direction
This means you can set the object to "Receive from Salesforce", if you don't want Planhat to sync Companies into Salesforce as new Accounts, but you can set individual fields to "Send to Salesforce", which can be particularly useful for sharing Planhat Company information (such as metrics) with colleagues working in Salesforce
For all other models/objects, the sync direction on the object level is the limiting factor, so you'd need to enable the model to sync to Salesforce if you want one of its fields to sync to Salesforce. It's still possible to have different sync options, along as the field isn't syncing in a way the object can't - see example screenshot below
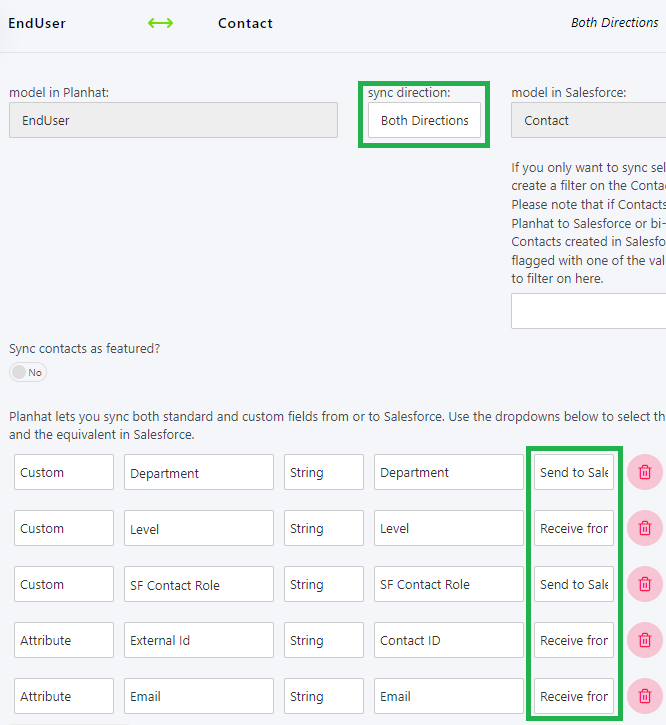
When setting up custom field mapping within the optional model/object sections at the bottom of integration, the field mapping is simplified:
You select the Planhat custom field from a single dropdown, regardless of whether it's a standard or custom field
You don't need to select the field type - it's automatically detected for you
Here's an example of what this can look like:

📌 Important to note
When mapping list/multipicklist fields, it's important that the values (possible options) in those fields are identical in both systems. For this, Planhat's values need to match the internal Salesforce API names, rather than the label names.
Either you can set this up manually, or (for eligible field pairs) you can select a checkbox to enable a feature whereby the Planhat values are automatically populated by (aligned with) the Salesforce ones. To learn more about this functionality, see our separate article here.
📌 Important to note
If you add new field mapping at a later date, click "Fetch Data from SFDC" for the relevant object/model section, so the new custom match field is enabled/synced.
📌 Important to note
If you can't see the custom model/object mapping sections at the bottom of the integration (where you can add sections and choose your own model/object pairs) but you would like to add this functionality to your subscription, reach out to your CSM.
Now you understand the principles, let's go through the practical steps of configuring the Salesforce integration in Planhat. Firstly, we'll start with connecting the two platforms.
Connecting Planhat to Salesforce
The first step in setting up the Salesforce integration in Planhat is to connect it to your Salesforce account. This is very simple - just follow these steps.
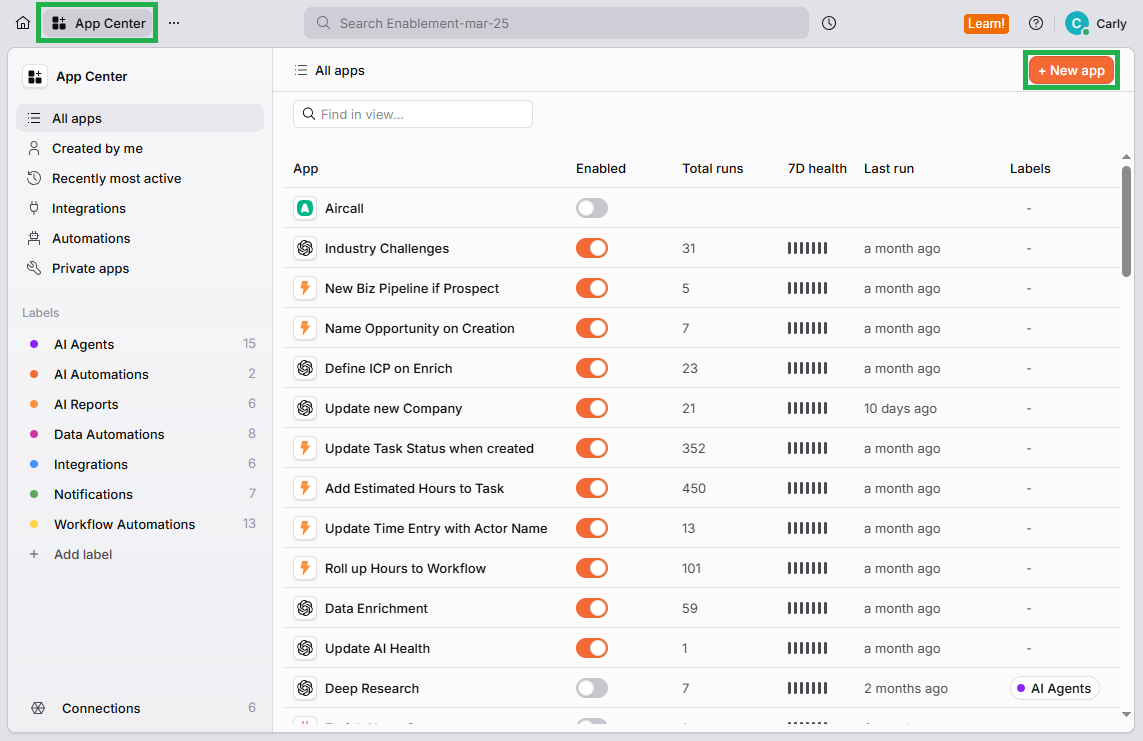

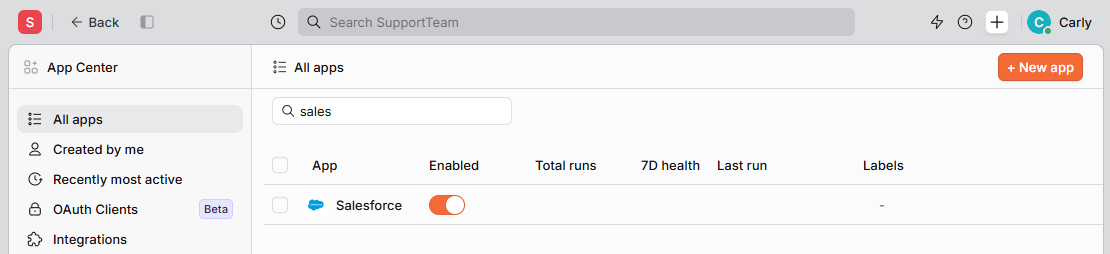
Now you've connected Salesforce to Planhat, you can start configuring the sections for each of the object/model pairings.
As we've already gone through the basic principles of sync direction, filtering and field mapping earlier in this article, we're not going to cover that again in detail for each object/model pair we describe, but instead we will focus on where there are different elements within the section.
Firstly though, let's start with the "Team" section at the top of the page.
Team (Users)
At the top of the integration, you will see the "Team" section. This is for syncing details of Salesforce Users and Planhat Team Members (Users) - i.e. you and your colleagues using Salesforce and Planhat. (Note that we are not talking about End Users / Contacts here.)
Be aware that this section of the integration does not create Users in either Salesforce or Planhat. Instead, it fetches Salesforce User details and save them into the integration settings.
This information is then used when you have field mapping between Salesforce User fields and Planhat Team Member (User) fields - e.g. syncing the Account Owner of an Account/Company. For this kind of field mapping, the integration checks the list of Users saved here in the integration settings, rather than checking the Salesforce org. It looks at the Salesforce User ID referenced in Salesforce User fields, and identifies their email address, so they can be matched up to the equivalent Planhat User. An advantage of the integration being designed in this way (saving the Salesforce User details within the integration) is that it allows the sync to be faster.
📌 Important to note
You need to create the Users (you and your relevant colleagues) in Planhat. You can add Users manually, including via a spreadsheet import. Speak to your TAM (or our Support team) if you need further help with this
The Planhat Salesforce integration matches Salesforce Users and Planhat Users via their email addresses, so they need to have the same email address in both systems to be identified as the same person
To set up the "Team" part of the integration:
Use the dropdown to select a Salesforce User field and associated field value(s) if you would only like to sync the details of a subset of Users into the integration
For example, you could select "Active" equals "Yes"
Click "Save" to save your selection
Click the "Fetch SF Users" to fetch the details of the Salesforce Users matching the filter, and save them into the integration
Optionally, click "Show Owners" to see a list of Account Owners in Salesforce, and whether they are currently a Planhat User or not
You can use this as a check/reminder to see if there are any additional Users you should (separately) create in Planhat
📌 Important to note
The Team section is included in the automatic sync from Salesforce to Planhat. This can detect when a new User is added in Salesforce, for example.
However, if a User's email is changed in Salesforce, that wouldn't be automatically detected by the integration, so you can use the "Fetch SF Users" button to manually sync in that change.
Also, if you update the Team filter here, you could use this manual sync to update the Users list right away rather than waiting for the next automatic sync job.
Now let's get started mapping the model/object pairs! In this article we'll go through each one, giving you step-by-step instructions as well as important notes and tips.
We'll list them in the order they are shown in the integration UI, but you don't necessarily need to set them up in this order.
Company - Account




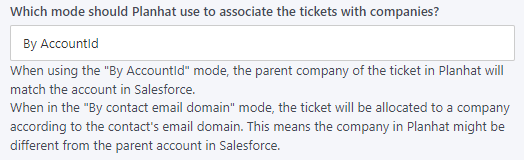
Ticket - Case
Salesforce Cases sync into Planhat on the Conversation model, type "ticket".
The Case section of the integration is unique in that it can only be a one-way sync, from Salesforce to Planhat.
End User - Contact
Choose the overall sync direction for the object/model
Optionally, choose if you would like to configure a filter so only selected Contacts sync in from Salesforce
Note that the Company/Account object acts as a kind of build-in filter, as only Contacts (End Users) belonging to an Account (Company) synced to Planhat are synced in
Choose whether to sync all Contacts in as "featured", a property/field in Planhat. In most case, you'll want to leave this toggle switch turned off
Configure custom field mapping, as required
Press the "Save" button to save your configuration
Note - Note
🚀 Tip
In April 2026 we introduced the ability to sync Planhat Notes (Conversations) to your choice of Salesforce object, e.g. Task. You would do this via a custom sync section at the bottom of the integration, as opposed to the pre-configured sync section we describe here. To read more about this alternative, see here for a quick overview or here for further details.
📌 Important to note
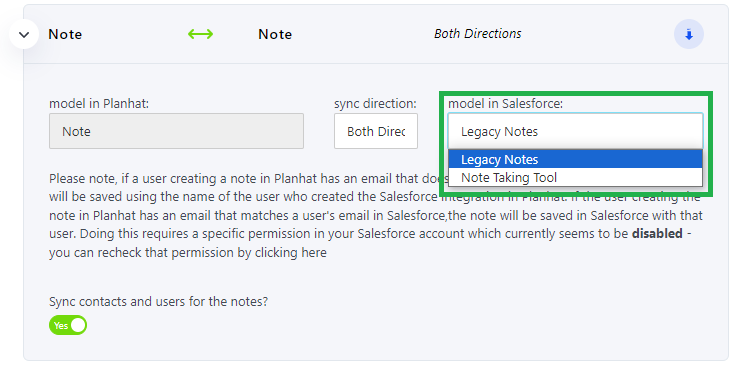
For the Note/Note standard sync section, the object on the Salesforce side can be either Note or ContentNote (your choice)
The model on the Planhat side is technically the Conversation model. Notes from Salesforce sync into Planhat as Conversations with type "note". Conversations of some other types can also sync to Salesforce via the "Note" part of the integration
The "Note" part of the integration is designed so that it only syncs under certain circumstances - e.g. it doesn't sync all new/updated Notes
It's optional to turn on this section of the integration. If you don't want to activate this sync, simply leave the section on "Not Syncing".
Task - Task
It's optional to sync Tasks. If you don't want to include them in the sync, simply leave this section on "Not Syncing".
Choose the sync direction
Use the checkboxes to filter Tasks from Salesforce by Profile. If no Profiles are selected, Planhat will fetch all Tasks
Optionally, configure custom field mapping
Press the "Save" button to save your configuration
License & NRR (Sale) - your choice of object (e.g. Opportunity)
📌 Important to note
In Planhat, recurring (subscription) revenue is stored on the License model, and non-recurring revenue is stored on the Sale (NRR) model. This section of the integration is special, as you have one object in Salesforce syncing to (potentially) these two different models.
📌 Important to note
You need to complete "Start Date", "Notice Unit" and "Notice Period" as a minimum, in order to have the option to save.
Asset - your choice of object
🚀 Tip
Planhat Assets can be used in a variety of ways, but typical use cases are to represent products or departments. Time-series data can be associated with Assets. If you would like to learn more about Assets, see here, or speak to your TAM or CSM.
📌 Important to note
If you don't currently have the Asset model available as part of your subscription, and would like to add it, reach out to your CSM.
Choose the sync direction
Choose which Salesforce object (standard or custom) to sync to Planhat Assets
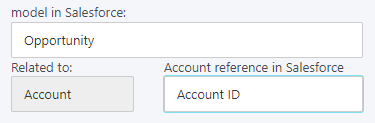
Specify the field on that object that relates to Account (e.g. Account ID)
Optionally, choose a field to filter the object on, and field value(s) corresponding to the records that you would like to include in the sync
Use the dropdown to select/confirm which field on the Salesforce object should map to the "Name" field on the Planhat Asset
Optionally, configure custom field mapping
Press the "Save" button to save your configuration
Project - your choice of object
🚀 Tip
Projects are initiatives that have a clear start and end date, such as competitions, courses or conferences. Time-series data can be associated with Assets. If you would like to learn more about Projects, see here, or speak to your TAM or CSM.
📌 Important to note
If you don't currently have the Project model available as part of your subscription, and would like to add it, reach out to your CSM.
Choose the sync direction
Choose which Salesforce object (standard or custom) to sync to Planhat Projects
Specify the field on that object that relates to Account (e.g. Account ID)
Optionally, choose a field to filter the object on, and field value(s) corresponding to the records that you would like to include in the sync
Use the dropdowns to select/confirm which field on the Salesforce object should map to particular fields on the Planhat Project:
"Name"
"Start Date"
"Mrr"
Under "Default options for Projects", you'll see "Currency", like you saw in the License section
Either select a currency ...
Or if you have activated multi-currency in Salesforce, then instead of the option to select a default currency, a message will display saying: "Salesforce Account with Multicurrency ON"
Optionally, configure custom field mapping
Press the "Save" button to save your configuration
Custom (extended mapping) sections
In addition to the main, pre-configured sections, you can also add additional model/object sections at the bottom of the integration. You can use this to map to new Planhat models (i.e. that you haven't mapped yet), such as Opportunity, Invoice or Campaign; or to map an additional Salesforce object to a Planhat model you have already mapped. This is also where you can set up a bidirectional sync for Notes (technically, Conversations) with your choice of Salesforce object (such as Task).
📌 Important to note
If you can't see the custom model/object mapping sections at the bottom but you would like to add this functionality to your subscription, reach out to your CSM.
For additional details on mapping custom models, see Salesforce Integration for Custom Models.
Opportunity - Opportunity
While commonly you may map the Salesforce Opportunity object ("Closed Won" records only) to the Planhat License model, you may also want to sync open Opportunities in Salesforce to/from the Planhat Opportunity model. For example, if you are focusing on CSQLs (Customer Success Qualified Leads) you may want your CS team to identify the Opportunity, create it in Planhat and sync it to Salesforce, or you may just want full visibility for teams in both systems.
Click the blue "Add New Section" button at the bottom
Select "Opportunity" as both the Planhat model and Salesforce object
Choose the sync direction
Specify the field on the Salesforce Opportunity that relates to Account (e.g. Account ID)
Choose the field to filter the object on in Salesforce, and the field values specifying which records to sync. For example, this could be "Stage" equals all options other than "Closed Won" and "Closed Lost"
Optionally, configure custom field mapping
As discussed earlier in this article, in these optional custom sections, the field mapping section is actually even easier than in the default sections - you simply select the Planhat and Salesforce fields from dropdowns, and select the desired sync direction
In these optional custom sections, there isn't a "Save" button, as the configuration is saved automatically
📌 Note
The Salesforce Opportunity object has a required field "CloseDate", which is defined as "Date when the opportunity is expected to close", so you need to set up custom field mapping for this if you are syncing from Planhat to the Salesforce Opportunity object. Note, however, that the Planhat "closeDate" field is the actual close date, so isn't populated for open Opportunities in Planhat. You can map a custom date field instead.
Extension objects
You can use a custom section at the bottom of the integration to map extra Salesforce objects to an already mapped Planhat model - e.g. map a custom Salesforce object called "Account Extension" to the Planhat Company model, in addition to the Salesforce Account object already syncing to Company.
Conversation (Note) - your choice of object (e.g. Task)
Earlier in this article we described the standard built-in, pre-configured sync sections for Note and Task, but in April 2026 we released the ability to sync Notes (technically, a subset of records from the Conversation model) bidirectionally with any Salesforce object. Most commonly you will want to sync Planhat Conversations (Notes) with Salesforce Tasks. We have a separate article focusing on this functionality here, or you can read an overview below.
The background context to this is that in Planhat we use the Task model for planned activities ("to do"), but then use the Conversation model for logged activities ("have done"), whereas in Salesforce, both planned and logged activities are recorded using the Task object.
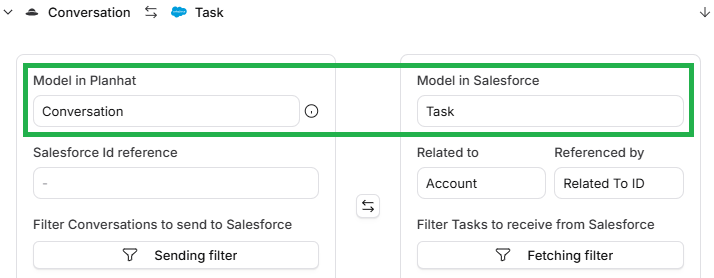
🚀 Tip
Although you may hear this described as syncing Planhat Notes with Salesforce Tasks, be aware that you need to select "Conversation" from the Planhat model dropdown menu, as shown above - you will not find "Note" in the list to select from.
📌 Important to note
Although the Conversation model is selected, note that not every type from the Conversation model would be included in the sync: records synced in from other integrations (denoted by the standard Conversation types of "email", "chat", "ticket" and "call") are excluded.
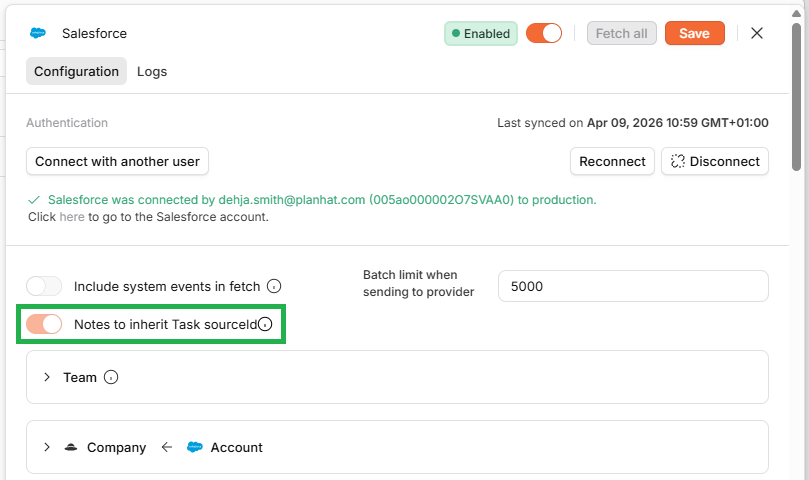
If you set up a sync section like the one pictured above, you will see a toggle switch appear at the top of the Salesforce integration called "Notes to inherit Task sourceId", as shown in the example screenshot below.
Click the image to view it enlarged
This shows you that Planhat Notes (Conversations) created from Planhat Tasks will inherit the Salesforce record ID from their parent Tasks. This is to avoid duplicate Task records being created in Salesforce, if both Planhat Notes/Conversations and Planhat Tasks are being synced to Salesforce Tasks.
Query Salesforce
At the bottom of the Salesforce integration (underneath the last sync section but above the "Add New Section" button), you will find the query tool.
This can be useful during setup, especially for troubleshooting.
You can read all about it here.
Further reading
Technical deep-dive articles - if you would like to learn more about specialist topics
Troubleshooting articles - if you have additional questions about syncing or errors