Roles & Permissions 🔐
Everything you need to know about Roles & Permissions in Planhat
⚠️ Please be aware
This article was written for the original Planhat platform (app.planhat.com).
For documentation on Roles and permissions in upgraded Planhat (ws.planhat.com), see our new collection of articles.
Here at Planhat, we understand the importance of assigning your team specific roles with the relevant permissions. The "Roles" feature is incredibly powerful and gives you the ability to lock down almost every area of the application!
We're going to discuss everything that you need to know about creating roles and setting permissions. Grab a coffee and let's dive straight in! ☕
📌 Important to note: Currently, the "Roles" feature is only available on the Planhat Enterprise plan.
How to Create a Role
Creating a role in Planhat is quick and easy! Follow these 3 simple steps:
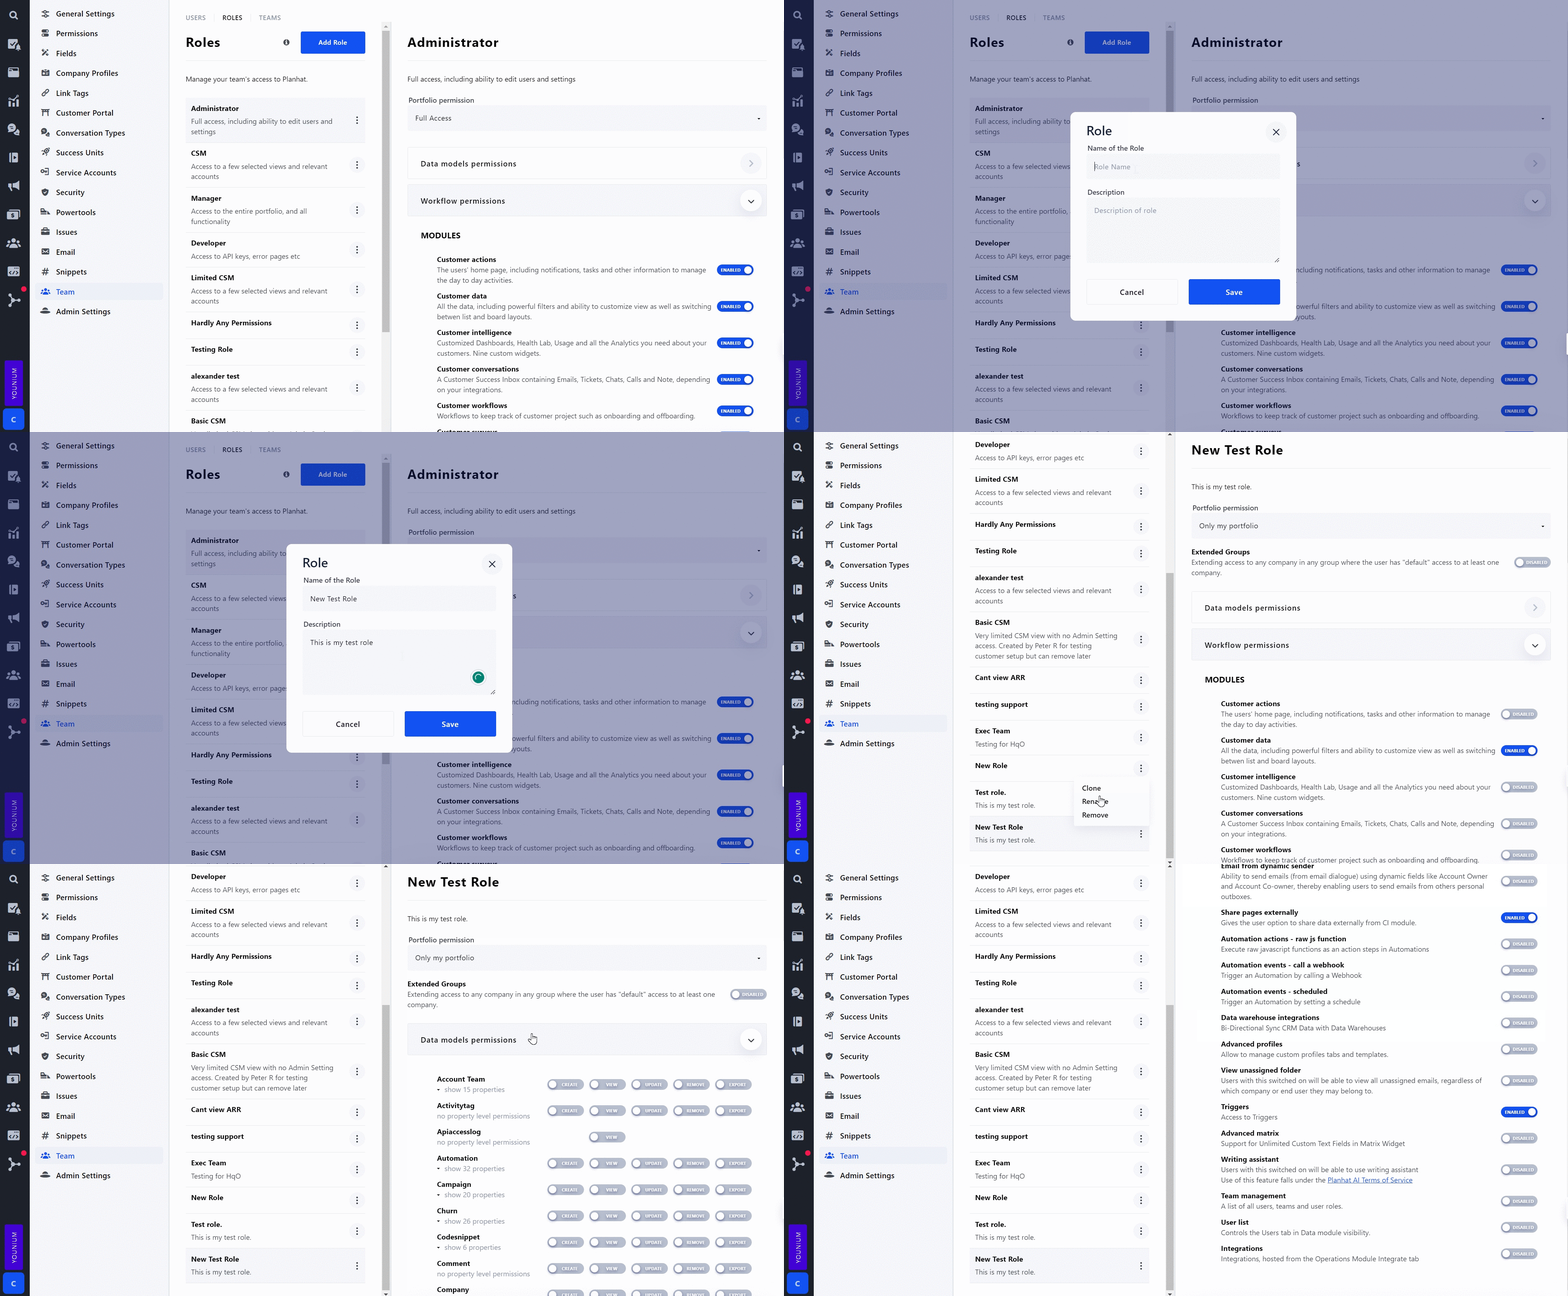
Hover over your avatar which is located in the bottom left corner, click on "Team" and then go to the "Roles" tab.
At the top of the "Roles" page, there's a button named "Add Role", click on that and a form will appear.
Give your role a name and description and then click "Save".
If you would like to rename, clone, or remove a role, click on the ellipsis icon on the right-hand side of the role.
📣 Pro tip: Cloning: If you click on the ellipsis icon which is located on the right-hand side of your role and select "Clone", it will completely clone all of the role's permissions. This is great if you have two roles that are very similar and you don't want to go through and set all of the permissions again. 😃
Role Permissions
Once you have created a role the next step is to set the permissions. Click on your role and the permission options will appear on the right-hand side. The permissions are broken down into three sections and I'm going to explain what you can do in each of those sections. Warning: the amount of power and flexibility in the permissions section is mind-blowing. 🤯
1. Portfolio Access
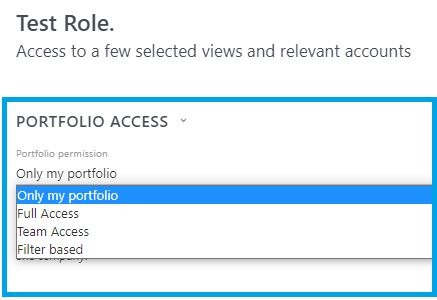
The "Portfolio Access" determines which accounts the user will have access to. There are several options to choose from:
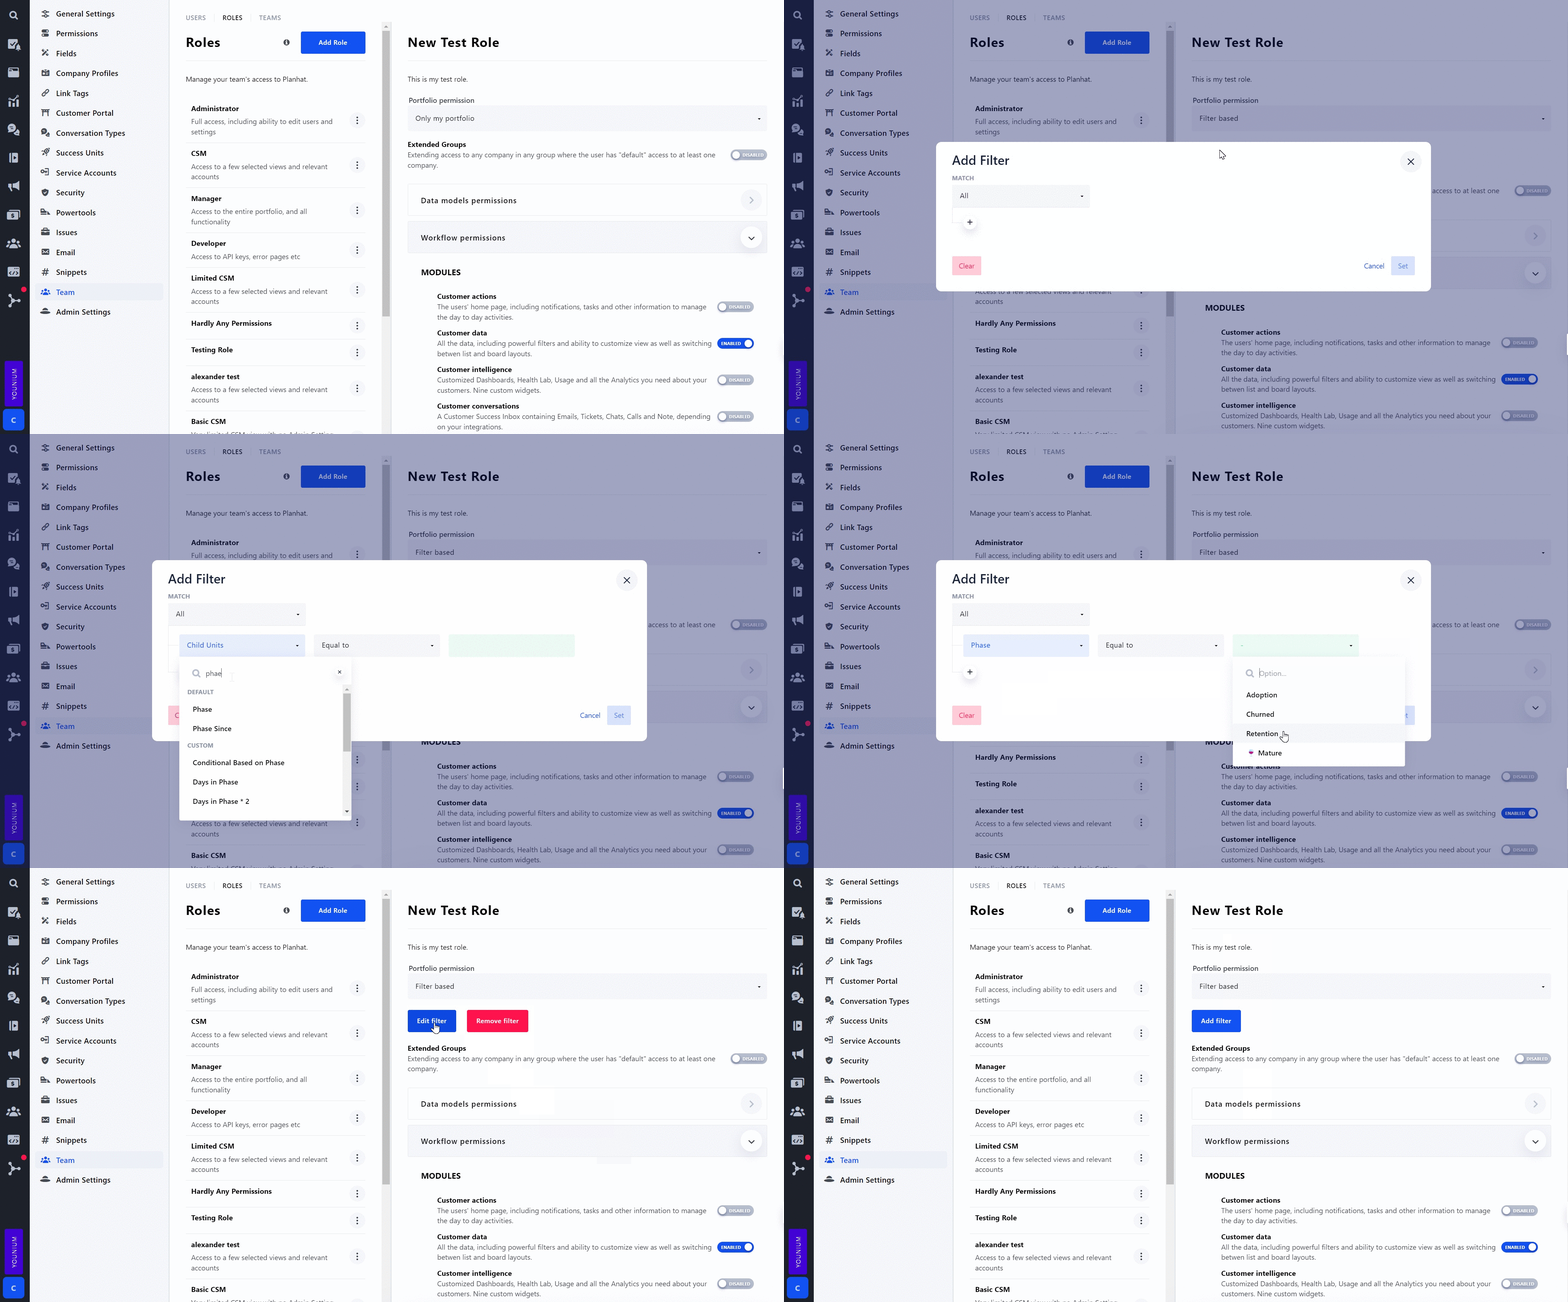
📣 Pro tip: Extended Groups: If you enable the "Extended Groups" option you will have access to any company in any group. If you haven't heard about "Group Structures" and would like to know more, then check out this article.👍
2. Data Models Permissions
The "Data Models Permissions" section is incredibly powerful! You get to choose what level of access rights the user has for each data model in Planhat. For each data model, you have the following options:

Simply click on each of the toggle switches to activate or deactivate the permission (blue is on and grey is off).
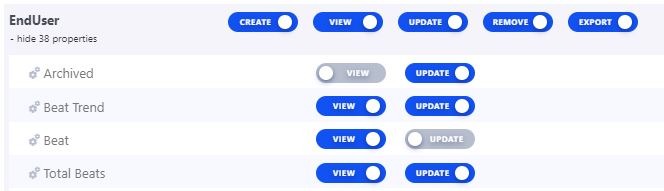
If for example, you wanted to hide the "End-User" tab on the "Data" module, you would scroll down until you see the "EndUser" data model and turn off the "View". Now, any user with this role won't be able to see the "End-User" tab. Similarly, you can stop users from creating, updating, removing, and exporting end-users by deactivating the relevant permissions. This is just one example, there are lots of data model permissions!😄
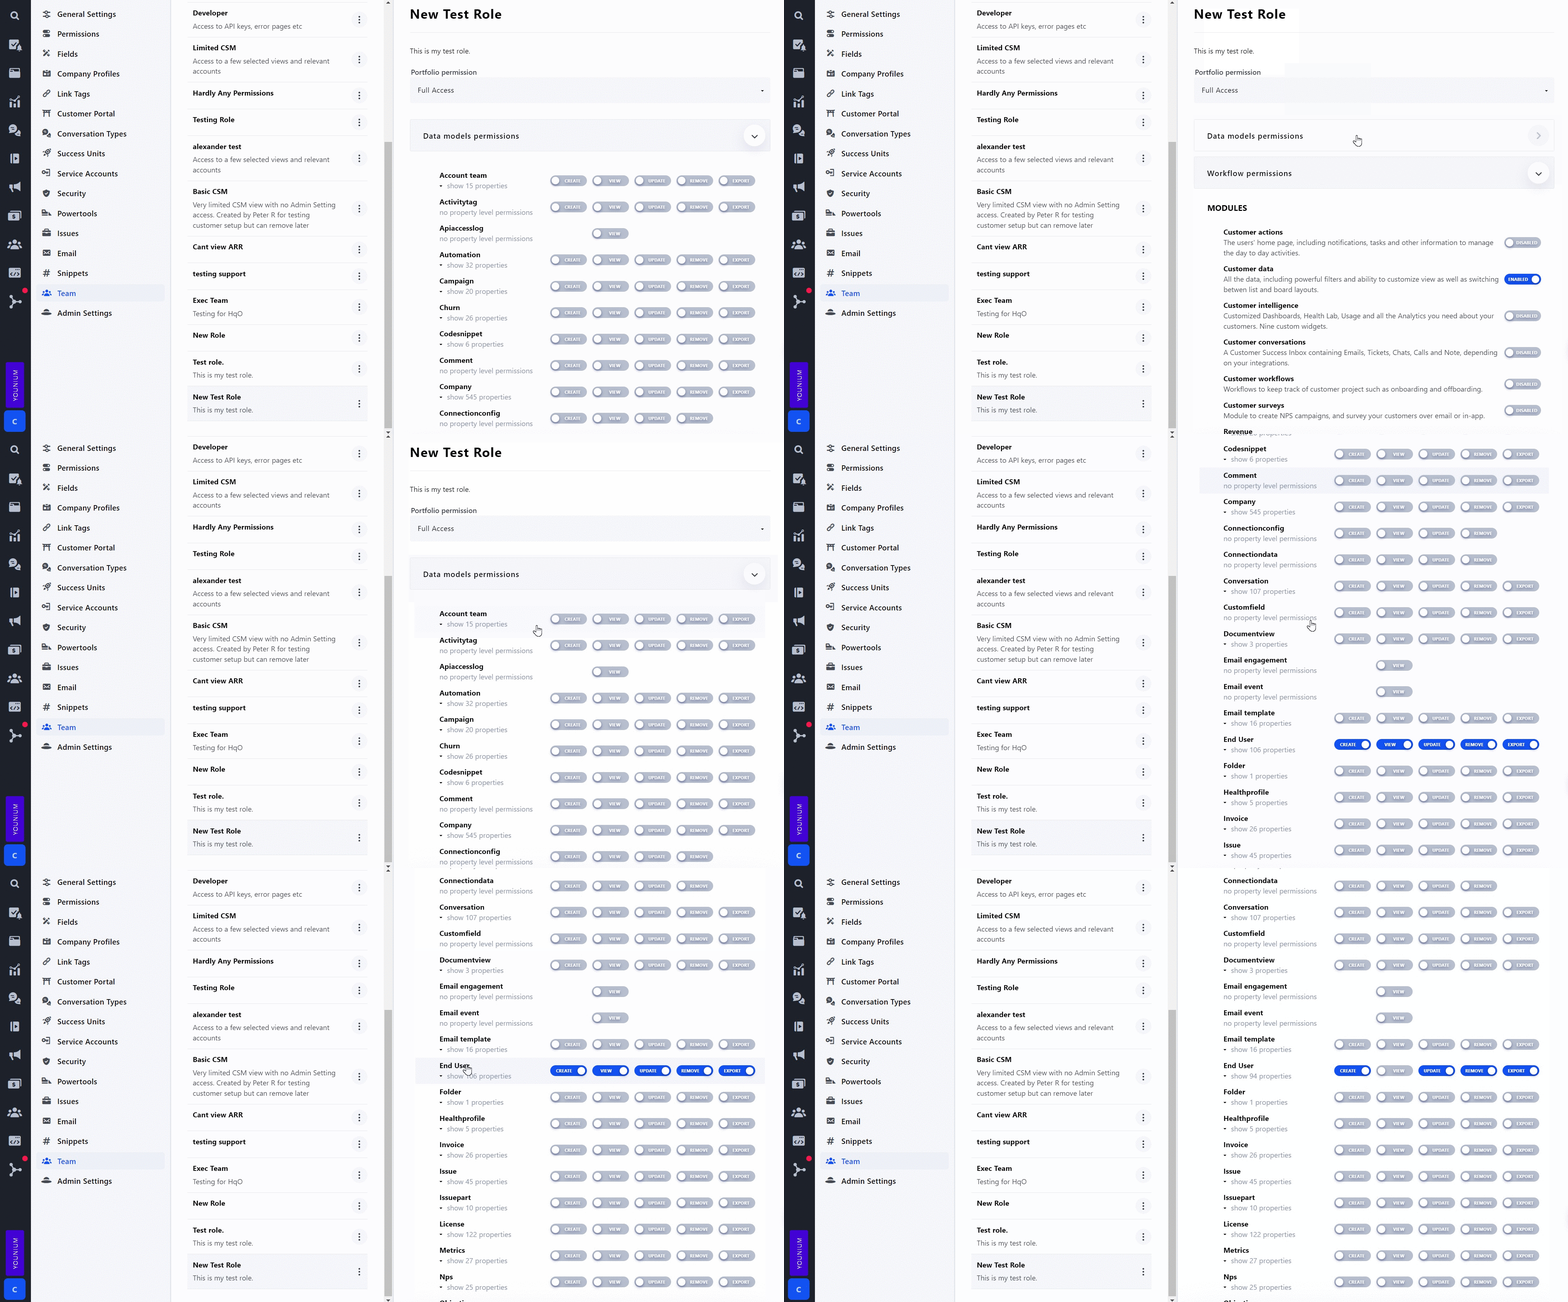
If you're not sure what a specific permission does, please reach out to support or contact your CSM. 😃 - I have listed several "Data Models Permissions" below and explained what each of them does:
Activity: Enable or disable the "User Activities" export on the "Customer Intelligence" module.
Activityfail: If this permission is enabled you will be able to view the list of failed activities on the "Customer Intelligence" module > "User Activities" page. If you have failed activities a warning sign will appear at the top of the page which you can click on to view the metrics that have failed to import.
Activitytag: This permission gives you the ability to edit and create "Labels" that appear on Activities.
Apiaccesslog: This is to do with the "Developer" module API Access Log.
Automation: Use this permission to determine if a role can view the "Automation" object. You can also grant the role the ability to do the following:
Create new automations
View and update specific fields
Remove automations and related data
Export data
Campaign: The "Campaign" permissions give you the ability to: disable or enable the "NPS" module and export option.
Churn: Use this permission to determine if a role can view the "Churn" object. You can also grant the role the ability to do the following:
Log churn
View and update specific fields
Remove churn data
Export churn data
Comment: This is related to comments on tasks and conversations.
Company: Use this permission to determine if a role can view the "Companies" object. You can also grant the role the ability to do the following:
Create companies
View and update specific fields
Remove company data
Export company data
Conversation: Use this permission to determine if a role can view the "Conversations" module. You can also grant the role the ability to do the following:
Create conversations
View and update specific fields
Remove conversation data
Export conversation data
Customfield: Related to custom fields, enable the ability to update, remove, view, and export custom fields.
End User: Use this permission to determine if a role can view the "End Users" object. You can also grant the role the ability to do the following:
Create end-users
View and update specific fields
Remove end-user data
Export end-user data
Healthprofile: Use this permission to determine if a role can view the health profiles on the "Customer Intelligence" module > "Health Lab". You can also grant the role the ability to do the following:
Create health profiles
View and update health factors
Remove health profiles
Export health history
Invoice: Use this permission to determine if a role can view the "Invoice" object. You can also grant the role the ability to do the following:
Create invoices
View and update specific fields
Remove invoice data
Export invoice data
Issue: Use this permission to determine if a role can view the "Issue" object. You can also grant the role the ability to do the following:
Create issues
View and update specific fields
Remove issue data
Export issue data
Licenses: Use this permission to determine if a role can view the "Licenses" object. You can also grant the role the ability to do the following:
Create licenses
View and update specific fields
Remove license data
Export license data
NPS: Use this permission to determine if a role can view the "NPS" module and object. You can also grant the role the ability to do the following:
Create NPS campaigns
View and update specific fields
Remove NPS campaigns and related data
Export NPS data
Opportunity: Use this permission to determine if a role can view the "Opportunities" object. You can also grant the role the ability to do the following:
Create opportunities
View and update specific fields
Remove opportunities and related data
Export opportunity data
Page: Determine if a role can do the following (and much more):
Create pages
View and update pages
Remove pages
Export data from charts
Workflow: Use this permission to determine if a role can view the "Workflow" object. You can also grant the role the ability to do the following (under "Modules", enable the "Customer Workflows" permission to be able to view the Workflow Module):
Apply existing Workflows to accounts
View and update information on Workflows
Remove Workflows
Export Workflow data
Workflow Template: This permission is to do with the Workflow Template, you can give the role the ability to create, view, update, and remove Workflow Templates.
Stateslog: This is also referred to as the "Phase". If this permission is enabled then you will be able to access the "Stateslog" object when building charts and graphs. Check out this article for examples where the "Stateslog" is used in a range of different charts.
Task: Add the ability for a role to create, view, update, and export task-related data.
Team: This is related to the "Teams" page on the "Team" module. Give the role the ability to add users to teams, create, rename, and remove teams.
User: Give the role the ability to create, view, update, and export user data. You can also determine which user fields are visible and which fields can be updated.
Userrole: This is related to the "Roles" page on the "Team" module. Give the role the ability to add, rename, clone, and remove roles. Also, the ability to enable role permissions.
Data Model Properties
Directly below some of the data models, you will see the message "+ show 'x' properties". If you click on the message, you will be presented with a list of fields that belong to that data model. For each field you have the options "View" and "Update" so if you don't want your user to view or update specific fields, simply disable those permissions.
3. Workflow Permissions
The "Workflow Permissions" section is made up of two parts:
3.1. Modules
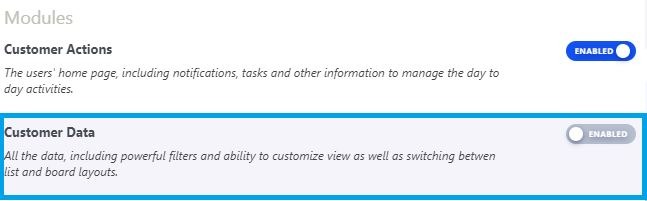
In the "Modules" section you can enable or disable any of the eight modules. For example, if I wanted to disable the "Data" module, I would disable the "Customer Data" permission. Any user with this role would no longer be able to access the "Data" module.
3.2. Features
The "Features" section gives you the ability to enable and disable a wide range of features within Planhat. Here's a non-exhaustive list of features that you might see:
Admin Access: access to various system settings across the application.
Logs: access to Logs (subject to object-level view permissions, but not to field-level permissions).
Customer Portals: the ability to enable the Customer Portal for specific customers and see the link on the company profile.
Import: option to upload data in a spreadsheet (model permissions still apply).
Manage Tags: ability to create NEW company and end-user tags. Other users can still apply or remove existing tags from their profiles.
Outreach: widget to send emails and chat messages (via Intercom) from Planhat.
Planhat Support Chat: the ability to contact Planhat Support via our in-app chat.
Revenue Forecasting: enables License forecasting fields in the application as well as manual forecast options in the revenue reports.
Share Filters: this gives the user the option to share filters with the whole team by making them public.
Share Folders: gives the user the option to share the folder with specific users, or the whole team.
Metrics in profiles: enables metrics sections of company and end-user profiles.
Metrics rebuild: give the user the option to rebuild metrics.
User Tracking: usage data can always be sent to Planhat, but if this module is inactive related data such as "user last active" will not be visible in the app.
Email sync: Gives the user the option to sync emails.
Email on my behalf: with this permission the user can let other team members send emails on their behalf, relevant to shared accounts such as success@yourcompany.com
Share pages externally: gives the user the option to share data externally from the Customer Intelligence module.
If you need any assistance or would like to discuss this in more detail please let your Planhat CSM know or contact support.👍