Planhat OS - "Revenue Setup" Tool
In Planhat OS, revenue settings are located in the "Revenue Setup" Tool rather than the main "Settings" Tool
Summary
The "Revenue Setup" Tool is the place in Planhat OS where you - as a Planhat Admin - configure revenue settings for your tenant
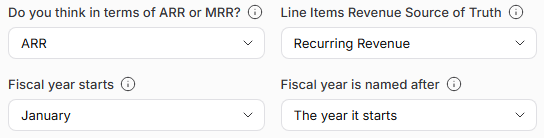
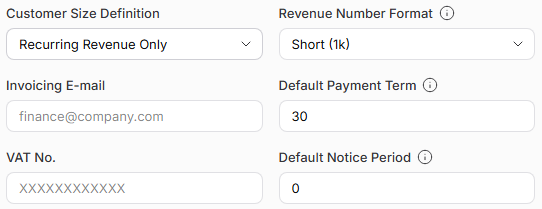
Settings within "Revenue Setup" determine how revenue is counted and shown: ARR or MRR, fiscal year, renewal rules, currencies and FX rates
It's also where you can access your Product Catalog, which is where you set up and manage your Products
"Revenue Setup" is its own Tool in Planhat OS, separate from the general "Settings" Tool. You can find it in the main Tools menu
Who is this article for?
Planhat Admins who configure revenue for their organization (e.g. Revenue Operations or Finance)
Anyone moving from pre-OS Planhat who is looking for Settings --> Revenue
Related articles
Other articles particularly relevant to this article are:
Article contents
Introduction
Revenue numbers are only useful when it's clear what they are referring to. If you're a Revenue Operations Lead at a company that sells in USD, EUR and GBP, reports in ARR, and starts its fiscal year in April, you need Planhat to align with this, otherwise reports could be confusing, and totals could mix three currencies. "Revenue Setup" is where you (as a Planhat Admin) configure revenue settings in Planhat OS, to tailor your Planhat tenant to suit your organization.
📌 Important to note - Planhat versions
In pre-OS Planhat, revenue settings were located within the "Settings" Global Tool; but in Planhat OS, the revenue settings have been split out into their own Tool, rather than being found in the general "Settings" Tool.
What is the "Revenue Setup" Tool?
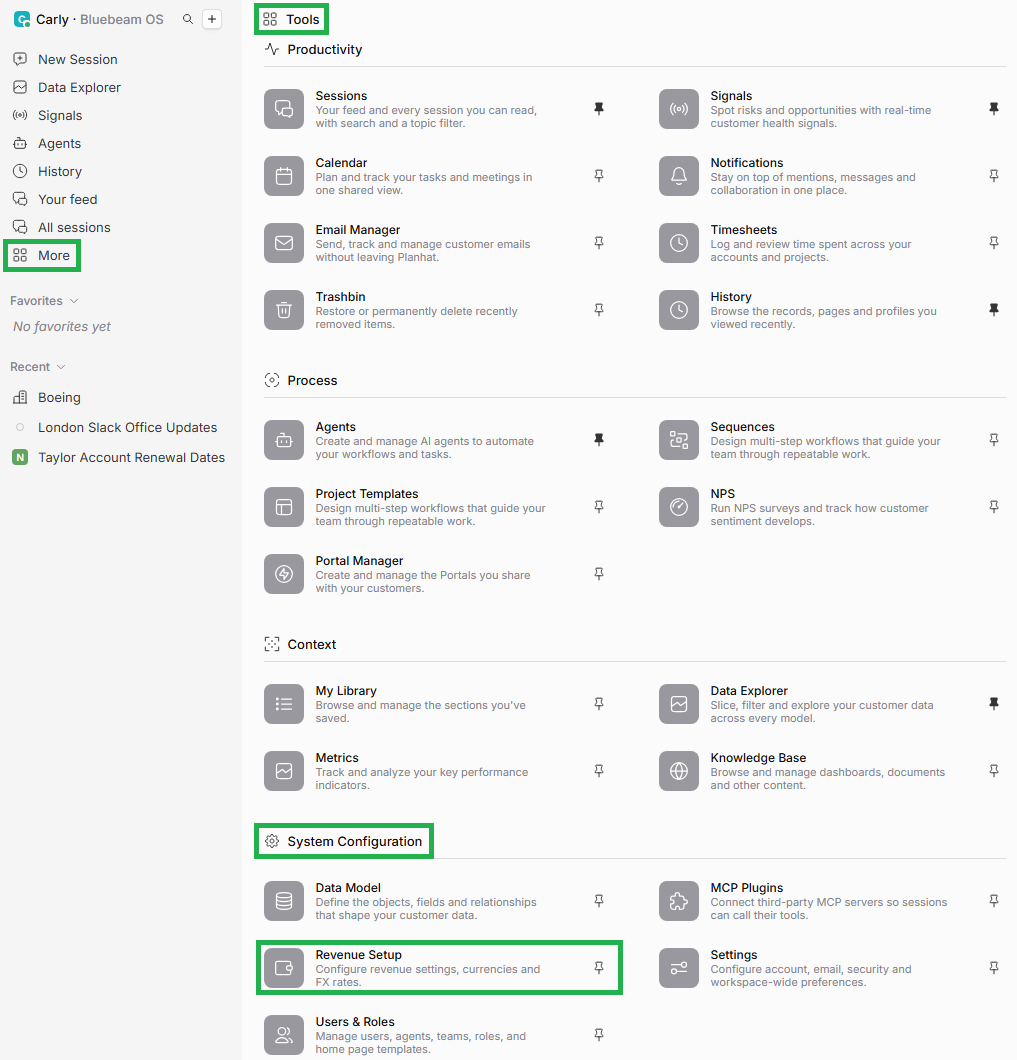
"Revenue Setup" is a Tool that you (as a Planhat Admin) can find in the "System Configuration" part of the main Tools menu in Planhat OS.
Click the image to view it enlarged
Once you've clicked into the "Revenue Setup" Tool, you'll see it has the following parts, from top to bottom:
📌 Definitions
Each Line Item represents either a "Subscription" (recurring revenue) or a "Fee" (non-recurring revenue)
Each Line Item belongs to a Deal, and each Deal belongs to a Company. This means that each Line Item will be something like "Advanced Data on Renewal Deal with Zoom"
Each Product acts as a template for a Line Item. Each Product just describes the Subscription/Fee itself - it's not connected to a specific Deal/Company. When you're adding Line Items to a Deal, you can save time by selecting an existing Product - although it's not mandatory to use Products
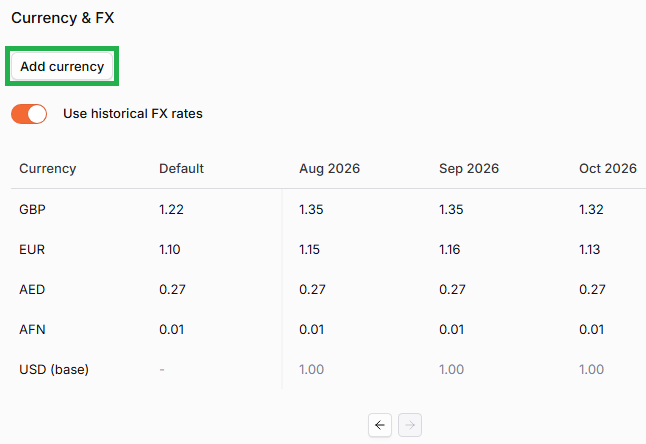
"Base currency" is the currency every other currency is converted into
📌 Important to note
You need the "Admin Access" workflow permission in your Role to be able to see/access the "Revenue Setup" Tool
The "Revenue Setup" Tool should not be confused with the "Revenue" standard Featured Page on a Company Profile, or the Revenue System Report Pages. The settings you configure in the "Revenue Setup" Tool feed into those charts/reports
Why use the "Revenue Setup" Tool?
You can customize your Planhat tenant in many ways to make it suit you and your business perfectly, and the settings in the "Revenue Setup" Tool are one way you can achieve this.
For example, you can ensure that your revenue in Planhat uses the correct choice of ARR v. MRR, has the correct fiscal year, and uses the correct base currency for you.
The Product Catalog (see below), accessed via the "Revenue Setup" Tool, houses your Products. Here you can view, add, edit or delete Products. Each Product acts as a template for a Line Item - when you're adding Line Items to a Deal, you can save time by selecting an existing Product, rather than entering all the details manually.
How to use the "Revenue Setup" Tool - examples
Of course, you can configure many settings here, as we described above. We are not going to list all of these here; instead, we will go through some example key points.
How to open the "Revenue Setup" Tool
In your Planhat OS sidebar, click on "More" to open the main Tools menu (as shown in the screenshot below)
Scroll down to the "System Configuration" category
Click "Revenue Setup"
Click the image to view it enlarged
🚀 Tip
If you will frequently be configuring settings within the "Revenue Setup" Tool, you can pin it to your sidebar, so you don't need to go via the main Tools menu. To do this, click on the pin icon to the right of the "Revenue Setup" name (which you can see in the screenshot above).
How to add a Product to the Product Catalog

📌 Important to note
If your tenant uses the legacy revenue models, the Products screen instead shows two lists: "Recurring products" and "Non-recurring products". Click "Add recurring product" or "Add non-recurring product", then enter the Product details.
📚 Further reading
To read all about the Product data model as part of the newer revenue model structure, check out our separate article here.
How to add a currency
How to change your base currency
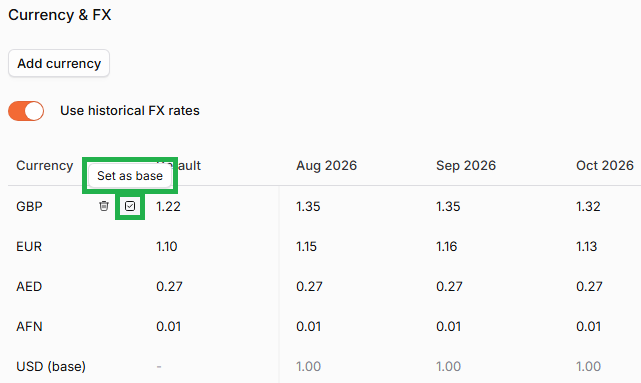
🚀 Tips
To use a different FX rate for each month, turn on the "Use historical FX rates" toggle switch
You can drag currency rows to reorder them
Frequently asked questions (FAQs)
Q: Where are the revenue settings in Planhat OS?
A: In the "Revenue Setup" Tool, which you can find in the "System Configuration" category of the Tools menu
Q: Why can't I find revenue settings in the "Settings" Tool in Planhat OS?
A: In Planhat OS, revenue settings have been separated out of the main "Settings" Tool and now have their own Tool: "Revenue Setup"
Q: Where do I manage Products in Planhat OS?
A: Open the "Revenue Setup" Tool, scroll down to "Product Catalog", and click "Open Products"
Q: How do I turn on the new revenue models (Deals and Line Items)?
A: In "Revenue Setup", under the "Migration to new Revenue models" heading, turn on "Enable the new revenue models". Speak with your Planhat contacts (e.g. your Deployment Strategist) if you need more help
Q: Why can't I see the "Revenue Setup" Tool in the Tools menu?
A: Only Admins can see and open it. By "Admins" in this context we mean Planhat users who have the "Admin Access" workflow permission in their Role