Branching in Automations
Use Branch steps for even greater flexibility in Custom Automations
Summary
"Branch" is a type of step you can use when configuring Custom Automations
Branching enables you to achieve multiple possible outcomes from a single Automation, so you don't need to create lots of separate Automations
Branch steps consist of a series of conditions - you define the criteria that determines whether each subsequent branch path of the Automation runs
Branch steps are only available in Automations in upgraded Planhat (ws.planhat.com)
Who is this article for?
Planhat Users who are building Custom Automations for their organization (e.g. Tech/Ops)
Series
This article is part of a series on Automations:
How to choose between Automations and other Planhat features
Branching in Automations ⬅️ You are here
Article contents

Introduction
Automations are one of the features in Planhat that enable you to automate actions, rather than needing to do everything manually - dramatically increasing efficiency, as well as a variety of other benefits.
We often describe Automations as working on the basic principle of "when x happens, do y", and a typical example could be "when a Company Health Score drops below 6, send a notification". But while some Automations can be simple like this, they actually can be a lot more advanced than this, allowing a great deal of flexibility.
One of your options when building Custom Automations is branching. This means you could have a range of possible processes/outcomes, all from a single Automation. So, your Automation could have the format of "when x happens; if condition A is met, do y; if condition B is met, do z". This is incredibly powerful.
In this article, you will learn all about "Branch" steps in Automations - what they are, why they're useful, and how to set them up.
What are Branch steps?
"Branch" is a step type you can select when configuring a Custom Automation. "Branch" is part of the "Logic and Flow Control" group of actions:
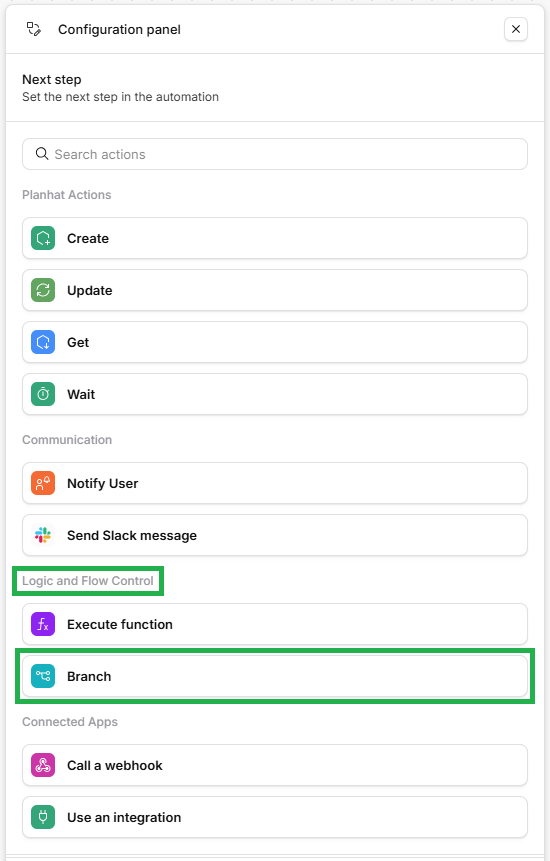
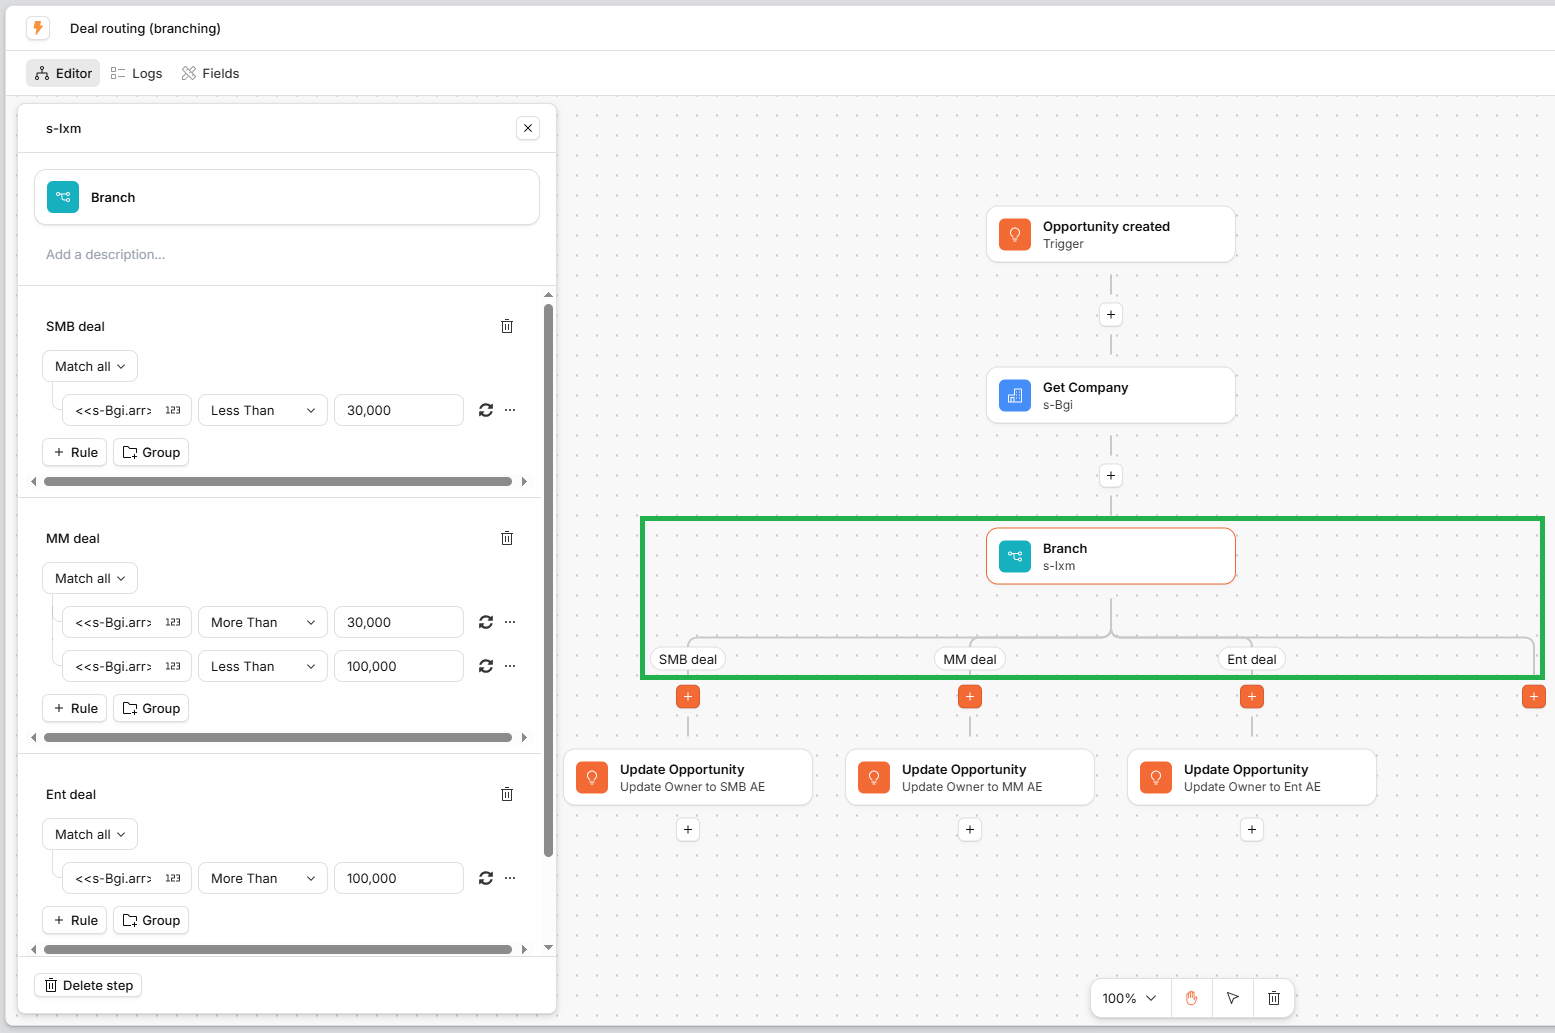
Branch steps enable you to configure a variety of possible outcomes, each with conditions to specify the circumstances when that path of the Automation will run. The Branch step itself consists of the different conditions "gating" the different paths, and then you can build additional steps after that.
The screenshot below shows an example Custom Automation, with the Branch step highlighted in green in the flow chart on the right, and showing in the configuration panel on the left. We'll talk you through the details of this example later in this article.
Click the image to view it enlarged
📌 Important to note
Branches in Automations do not operate via an if/else basis, with each condition considered in sequence.
When an Automation runs, all branches where the conditions are met will run.
This includes branches where there are no conditions specified - any branch with an empty condition will always run.
You therefore need to set a condition for each branch; and if you want a setup where only one branch runs per Automation run, the conditions need to be mutually exclusive (i.e. non-overlapping).
Why use Branch steps?
Branch steps are perfect for processes with branching logic rather than purely linear logic (i.e. you want the outcome of the Automation to be y and/or z, rather than always y). So, for example, you could use a Branch step for deal routing, such as:
When an Opportunity is created ...
... assign it an Owner based on the Company ARR:
If the ARR is less than $30,000, assign the SMB Account Executive
If the ARR is between $30,000 and $100,000, assign the Mid-market Account Executive
If the ARR is more than $100,000, assign the Enterprise Account Executive
There are, of course, a range of possible variations of this - e.g. maybe you assign Opportunities (deals) based on region rather than Company size.
And we're sure you have many of your own additional processes where branching would be useful!
🚀 Tip
Your branches don't need to be mutually exclusive (non-overlapping) like in the example above, if you're happy for multiple branches to run at once - as a reminder, if multiple conditions match, all relevant branches will run.
How to set up Branch steps
When you are configuring (creating or editing) a Custom Automation (see here for general information on how to do this), you select "Branch" as the type when adding a step:
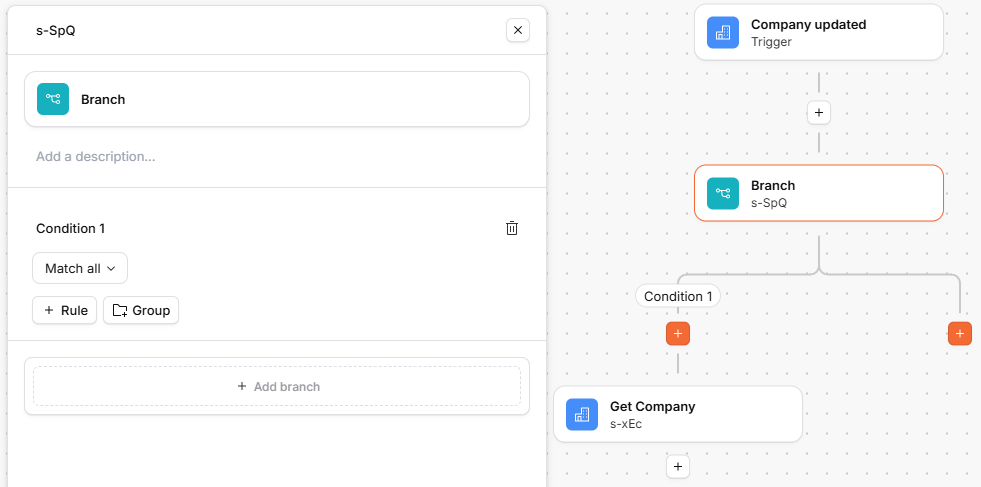
Once you've selected a Branch step, the Automation editor will look something like this:
Click the image to view it enlarged
It's important to note that the "conditions", as shown in the flow chart on the right, are actually part of the Branch step - so if you've been looking at another part of the Automation and want to view or edit them, you click on the Branch step to show them in the left-hand panel (rather than clicking on the conditions themselves).
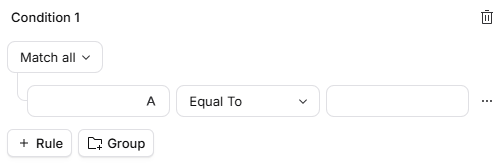
As you can see in the example screenshot above, initially the Branch step will show "Condition 1" - here you can specify the details of your first condition. Your condition is a rule, like a filter, to determine when that part (path) of the Automation (i.e. the step(s) shown after this condition) should run.
To configure your conditions:
📌 Important to note - a reminder (as mentioned earlier in this article)
Branches in Automations do not operate via an if/else basis, with each condition considered in sequence.
When an Automation runs, all branches where the conditions are met will run.
This includes branches where there are no conditions specified - any branch with an empty condition will always run.
You therefore need to set a condition for each branch; and if you want a setup where only one branch runs per Automation run, the conditions need to be mutually exclusive (i.e. non-overlapping).
Worked example of an Automation with a Branch step
Now you understand the principles of how to create Custom Automations with Branch steps, we'll bring it all together with a complete example of such an Automation.
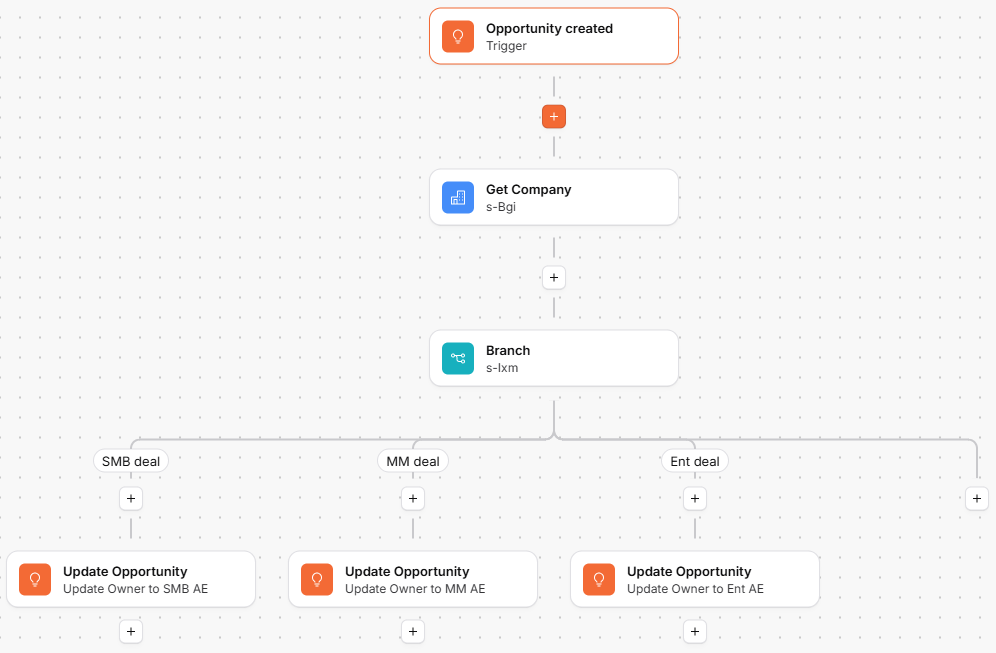
This is an Automation for deal routing/assignment. When an Opportunity is created, it "Gets" the Company it's associated with, and then updates the Opportunity so its Owner is a particular User (of Planhat) depending on the ARR of the Company. This is useful for a scenario where a different Account Executive (AE) will be responsible for the Opportunity depending the Company "size" (tier/segment).
Click the image to view it enlarged
Let's go through all the component elements of this Automation, clicking on each box in the flow chart in turn to open up its configuration panel on the left-hand side.
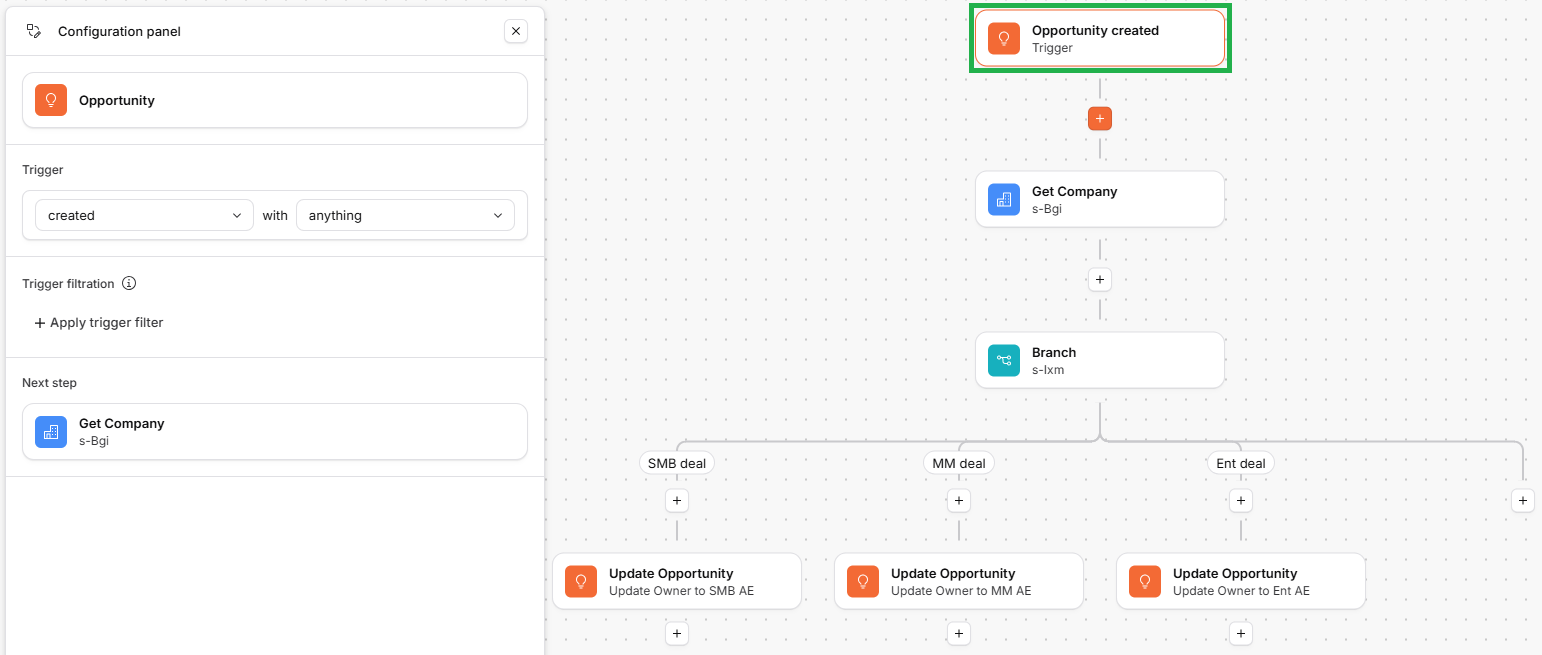
Trigger - "Opportunity created"
The Automation is triggered whenever an Opportunity is created.
This is set to "created with anything", without any trigger filtration, because we want the Automation to trigger whenever an Opportunity record is created.
Click the image to view it enlarged
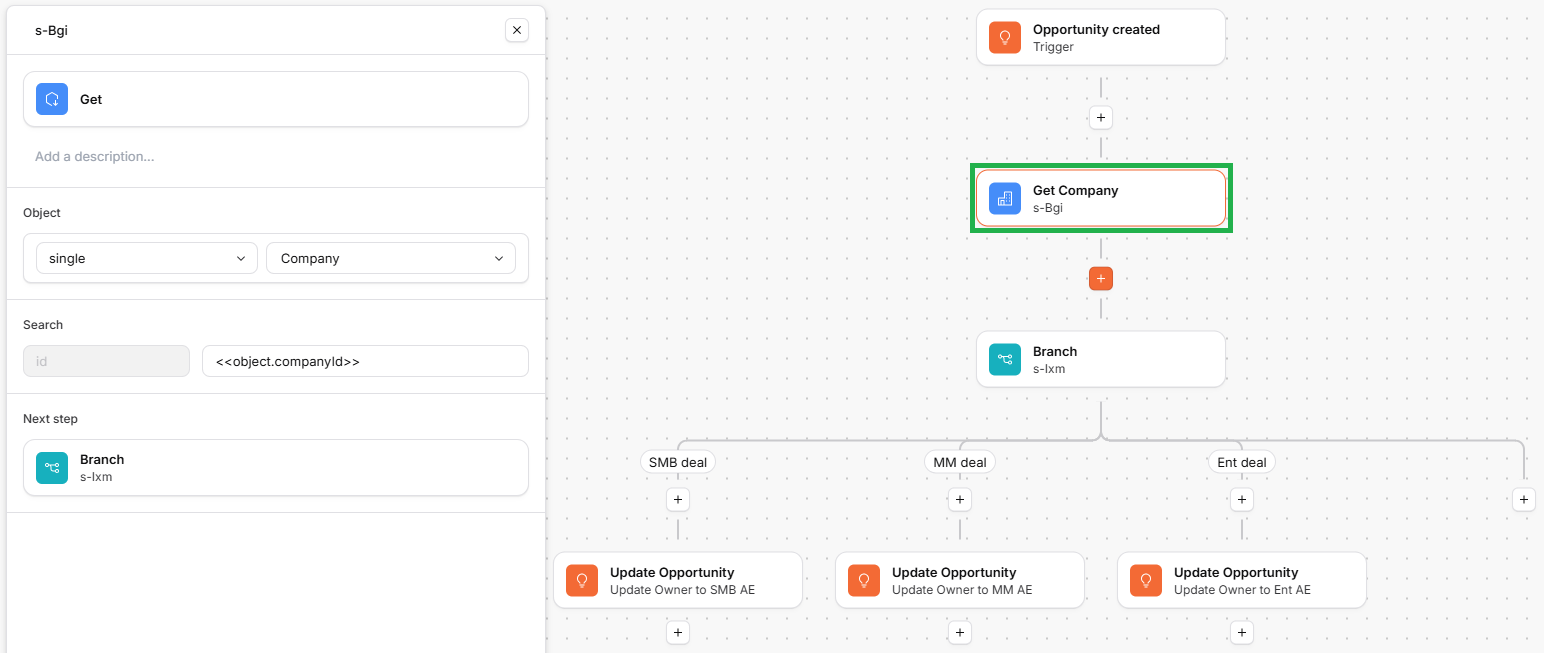
"Get a single Company" step
Because we want to use information in the Company record that's associated with the Opportunity record that triggered the Automation (e.g. the trigger record could be the "Data Backup" Opportunity that's been created for the Company "GSK"), we need a "Get" step to retrieve that Company.
We identify the relevant Company via the "companyId" field on the Opportunity model/record (the "object"), so we use the replacement code <<object.companyId>>. To learn more about Automation replacement codes, check out our separate article here.
Click the image to view it enlarged
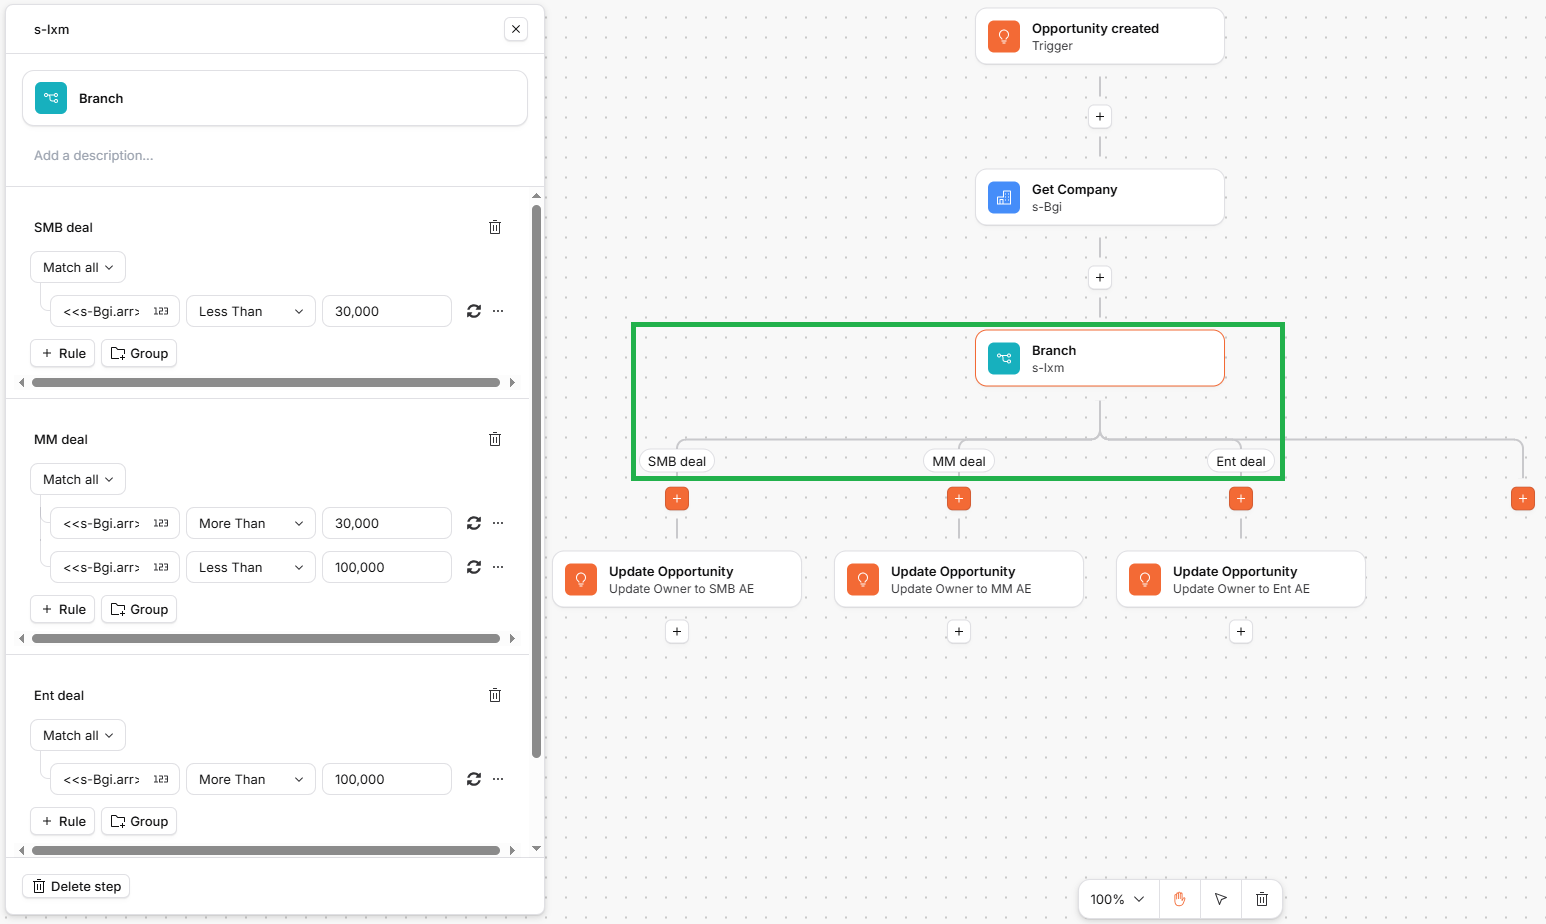
Branch step - looking at Company ARR
Next, we have the actual Branch step. This Branch step has 3 different conditions, each looking at a different Company ARR range.
Click the image to view it enlarged
Let's zoom into the conditions in this Branch step:
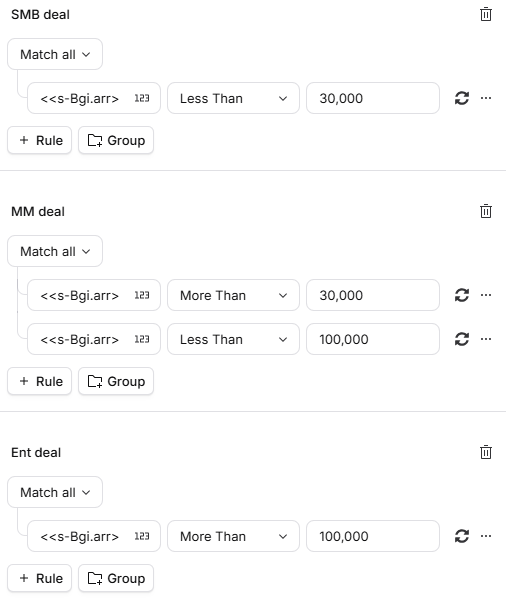
For all of these, in the left-hand box we use the replacement code <<s-Bgi.arr>> to refer to the "arr" property (field) on the record in the "Get Company" step, which we did not rename from automatically generated step name, and in this case is "s-Bgi". If we had renamed that "Get Company" step from "s-Bgi" to "Step 1", for example, then our replacement code would have been <<Step 1.arr>> instead.
Other points to note:
In this example, we have renamed "Condition 1" to "SMB Deal", "Condition 2" to "MM Deal", and "Condition 3" to "Ent deal". This is primarily so it's clear what the different branch paths are when looking at the flow chart, but it also makes it clearer when viewing the Automation logs, which we discuss at the end of this article
The "123" next to each replacement code in the screenshot denotes that we have specified that the property in question ("
arr") is a number fieldTechnically, the numerical ranges in the right-hand boxes in this screenshot should be adjusted slightly, to ensure no value can fall between the ranges
3 x "Update Opportunity" steps
Finally, underneath the 3 conditions of the branch step, there are 3 separate steps to update the Opportunity, assigning an Owner based on the Company ARR. Remember, which of these 3 steps runs will depend on which of the conditions are met.
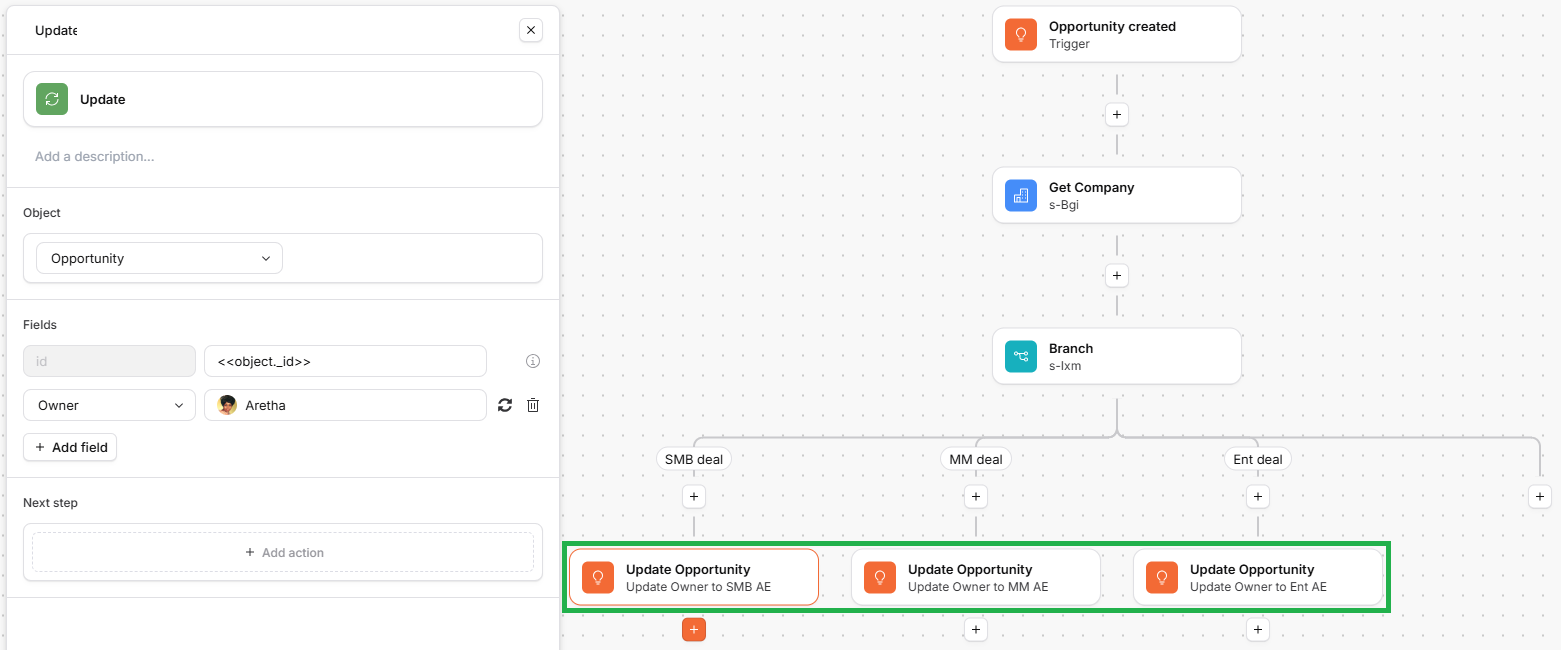
Click the image to view it enlarged
All of these steps have the same format, so we'll look at the configuration panel of one of them to explain them all.
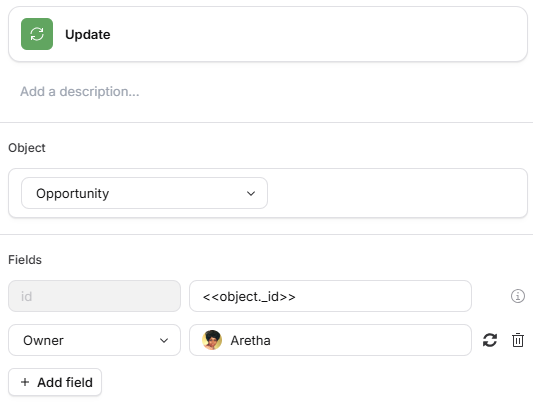
Initially in the step we have specified that we want to update an Opportunity - so far, so simple!
Next to the mandatory, grayed-out "id" box, we use the replacement code <<object._id>> to specify which Opportunity we want to update - since "object" in this Automation refers to the Opportunity triggering the Automation, and "_id" is its Planhat ID, this line simply says that we want to update the Opportunity in the trigger.
In the line underneath, we have chosen the "Owner" field on the Opportunity from the dropdown menu, and then chosen a Planhat User (i.e. you and your teammates) from the User picker - in this case we have chosen Aretha, because she is our Account Executive who's responsible for SMB Companies.
Finally, we have renamed the step to "Update Owner to SMB AE". While renaming the step is optional, it makes the steps clearer in the Automation flow chart, as well as in the logs (as we will discuss in the next section).
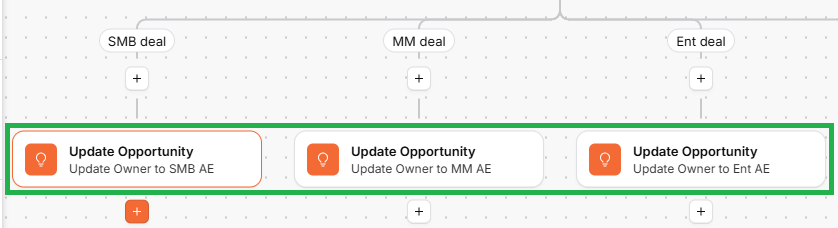
Viewing the logs of branching Automations
We have a separate article on Automation logs here, but here let's focus on logs for Automations with a Branch step. We'll show the logs for the Automation we just talked through in the previous section of this article.
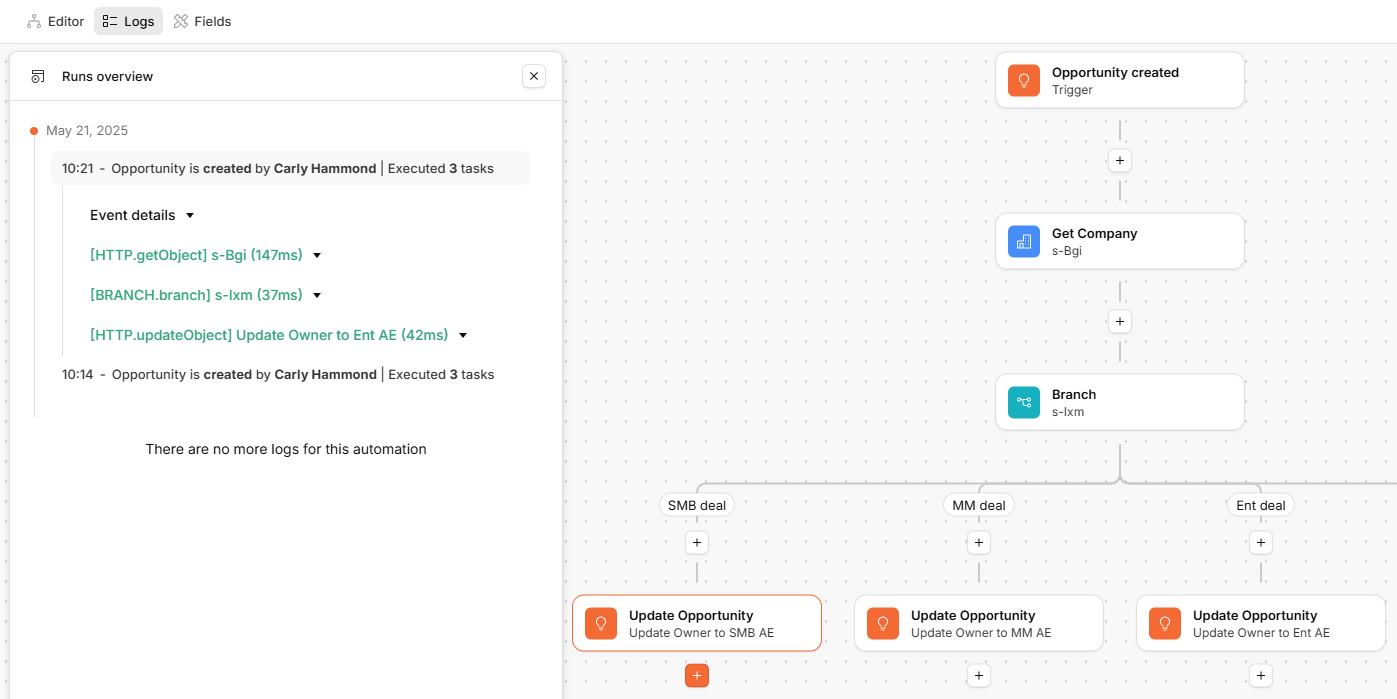
Click the image to view it enlarged
As usual with Automation logs, successful steps are shown in green.
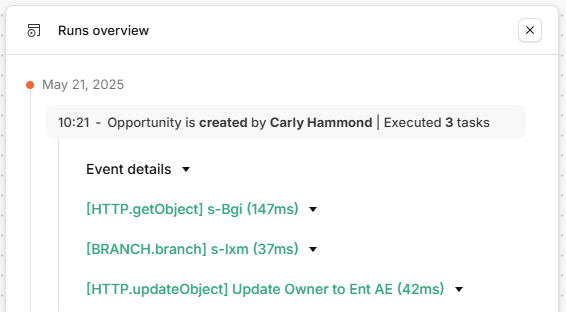
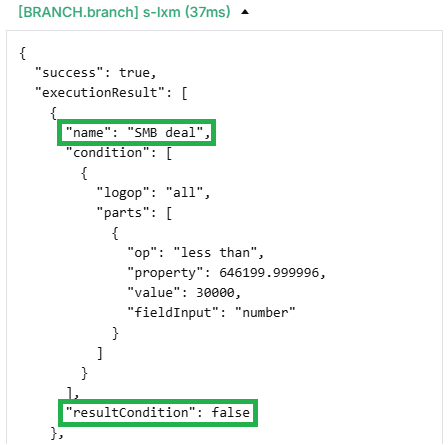
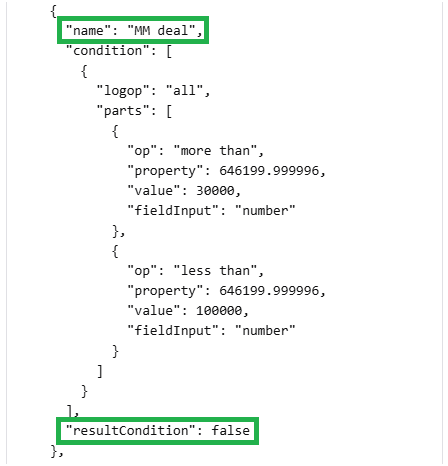
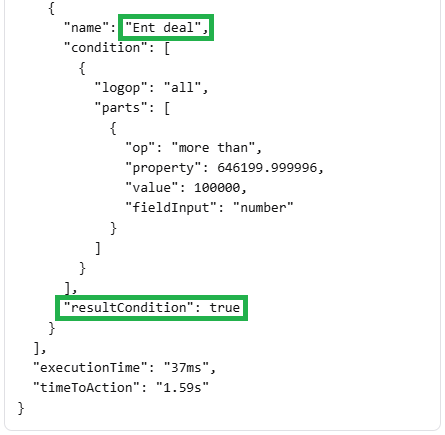
At this level (i.e. without opening up any step details), we can see which of the branch paths was taken: "Update Owner to Ent AE" (shown as the bottom green line above). Remember, we renamed this step from the original random alphanumeric name - here it's making it easier to identify which step ultimately ran.
We can also expand out the Branch step (the middle green line), and this shows that each of the 3 conditions of this Automation were checked, and the Ent one was the only condition met in this case. Again, remember that we renamed these conditions, which in this case makes it clearer what each condition is for/doing, compared to if they had the original names of "Condition 1" and "Condition 2" etc.